
PKM
How I Think with AI (Beyond Prompting)

Beyond Prompting
Have you ever had this experience? You ask Generative AI (GenAI) for help with a problem, looking for an answer, and the AI gives you an impressive-sounding answer that does not actually help? Sure the response is polished and confident. It might even be creative - but when you try to use the result it misses the mark. Lately I have been having this problem with ChatGPT, where it rushes ahead, seemingly more interested in proving how smart it is, instead of helping me solve my problem.
You know that GenAI should be really helpful, and you hear other people are making it do amazing things, but you can’t quite seem to get there, and you don’t know why.
In an earlier blog post, I shared the idea that if you can hire and direct a coder, you can probably direct GenAI to do some Vibe Coding for you. I still believe that. However, I need to refine that with some information I just learned today. Thanks to a blog post by Tiago Forte, he revealed that most Generative AI are fed a “System Prompt”, which can be hundreds of pages. These prompts shape how the Agent responds to you. ChatGPT, Claude, and Gemini are all engineered with specific guidelines and rules that cause them to behave very differently.1 It is likely that this is why I prefer Claude and Sonnet 4.5, and avoid ChatGPT and Gemini for serious thinking. Still, having said that, these tips can help you get more out of your agent experience. They have helped me, I feel confident they can help you too.
Four Common Ways People Use AI
However, what I have found is that most people tend to use AI in one of four ways (see if any of these sound familiar to you):
Most People Treat AI As:
- An answer machine (“give me the solution”)
- A validation engine (“tell me I’m right”)
- Replacement for Search (“find me information”)
- Assignment Completer (“do this for me”)
While these are valid ways of working with GenAI, if they are the only ways you interact with GenAI, you might be missing out on one of its most powerful uses. Namely, are you using GenAI as a thinking partner?
A Thinking Partner
The core problem is that most people who use GenAI ask, “Give me a solution to X.” In contrast, I tell GenAI, “Help me think through X.” That small shift changes everything.
This is not about more clever prompts, it is about unlocking one of the most powerful features of your own brain. It turns out, we are not so good at evaluating our own thinking. We are primed to confuse “reasoning” with “reason.” Psychologically speaking, reasoning isn’t logic. Logic is an amazing tool for evaluating propositions, and we all possess an impressive array of cognitive talents that can be categorized as reason, but ironically, reason-ing is something else.
A Very Human Bias
Reasoning is coming up with plausible sounding justifications for why you think, feel, and believe what you do. Put another way, we use reason-ing to generate justifications we and our peers will accept as reason-able.
French cognitive scientist Hugo Mercier discovered that individual reasoning is biased and lazy because reason is best performed as a group process. When we reason alone, we only look for justifications why we’re right and the brain doesn’t really care whether the reasons are good or not. As a form of energy conservation, the brain is quite happy to spit out superficial and shallow “reasons.”
To the point:
When you argue with yourself, you win.
We Evaluate Others' Thinking More Critically Than Our Own
When subjects were asked to submit rational arguments to researchers, and those same arguments were later presented back to these same subjects as if they came from someone else, the subjects shredded the justifications they themselves had created. This shift from “it’s my idea so it’s okay,” to “it’s someone else’s idea, I better think it through” is nearly universal. In short, we reason better when evaluating someone else’s ideas compared to our own.
Cognitive psychologist Tom Stafford examined dozens of studies where group reasoning arrived at the correct answer when individual reasoning failed. A stunning 83% of people got at least one question wrong when taking a Cognitive Reflection Tests individually, and a full third of people got all the questions wrong. But here’s the kicker, in groups of three or more? The teams never got any questions wrong.
Thinking By Yourself
This bias to accept our own reasons can create a massive blindspot. One that GenAI can help you uncover. When you look at the four primary ways people use GenAI, they all share one thing in common: None of them ask the user to think better themselves. None of these prompts expect the user to examine their own reasoning and rationale.
That is what is different about my approach2. I use the GenAI to act like someone who can help me think better. Because of not only the staggering breadth of knowledge of these Large Language Models, but also their capacity to adopt different personas, you have a veritable army of cooperative thinkers at your disposal.
Thinking with GenAI
So how do I actually use GenAI to think better? One of the things I love about GenAI is that it can “get up to speed” on my problem extremely quickly. I can load up resources, reference material, everything I need to give it context. In fact, it is extremely difficult in my experience to have these kinds of conversations with other people, mostly because it feels like an unreasonable demand for them to know as much or more than I do about the problem I am trying to solve. They have their own problems, they don’t have time to dig into mine in any depth. But GenAI can do that almost instantly.
And powered with this detailed context, I can begin to have what I call “thinking conversations.”
A Different Approach
First and foremost, I treat GenAI as a thinking partner3, not as a service. Second, I bring my domain expertise to the conversation and ask the GenAI to bring its perspective. A typical interaction is something like:
I am seeing this, or I am thinking this.
What are your thoughts?
Other tools I use are to rephrase what the GenAI has told me, or what I have learned:
So what you are saying is...
Did I get that right?
Or, if we are working through connections and insights, I can use prompts like:
Walk me through this, one step at a time. I want to make sure I understand how these things are related or connected.
I can get the GenAI to teach me, but also to evaluate my own perspectives and insights. It is much easier for me to see the flaws in my own thinking (my reason-ing) when I see it processed and presented back to me through the language engine of GenAI. The GenAI can do something for me my brain can’t do for itself: process my thoughts and justification and present it back to me as if it came from someone else. This activates my own higher critical thinking, making it easier for me to spot flaws and refine arguments until I get closer to a better understanding.
I realize this all sounds a bit abstract, so let’s look at a concrete example. Murdle.

An Example
So let’s take a look at the different approaches, so you can see them side by side.
I will give you one example that comes from a recent experience and a blog post. I was playing Murdle, the murder mystery game, and I got stuck. I could have done this:
Solve this puzzle for me.
And that is a very common way to work with GenAI. However my approach (which you may recall) was to ask the agent:
Can you help me learn how to solve this kind of puzzle?
In both cases I would have shared the murder mystery, but in the first prompt, I am simply offloading the problem solving to the agent. In the second prompt, I am asking it to help me think better about the problem. The first prompt produces a concise answer:
Professor Green committed the murder with a Candlestick, in the Laundry Room.
However, the second prompt generated a very long conversation which identified the logic puzzle I struggled with (inclusive vs exclusive or), and how to approach that kind of problem in the future. Yes I got the answer to the puzzle, but I also got something much more valuable. I got a method for dealing with problems like this in the future.4
Here's the playbook for "murderer always lies / innocents always tell the truth" layered on top of a 3×3×3 logic grid:


# How to solve these cleanly
1. Make two workspaces
2. Translate each statement into testable facts
3. Truth/lie consistency check (the key step)
4. Lock the survivor
5. Common pitfalls to watch
This answer is significantly more powerful, and for my tastes more interesting. Using this methodology, I can ask the agent to help me debug my own thinking as I work through puzzles. Using this method allowed me to complete the next 21 puzzles in the book I bought, which I found highly enjoyable.
The Hidden Advantage
When I use GenAI to help me think through a problem, instead of giving me the answer to the problem, I gain the benefit that I know the answer because I produced the answer. As I shared when I talked about the Feynman technique, memory is not an act of recall, it is an act of reconstruction. We know what we are able to produce, like a rendition of the song “Happy Birthday5”, you really know what you can “produce” from memory.
When the GenAI gives me the answer, I don’t know it. It knows it. I might be familiar with it. I might recognize it. Without the presence of the AI however, it is very unlikely I will produce the answer on my own. When the GenAI helps me think it through, I am significantly more likely to use that knowledge effectively.
To me, this is a super power. In a knowledge economy, he with the access to the best knowledge often comes out ahead.
But it is also practical. It makes me more effective moment to moment, and not so completely dependent upon the device to think for me. If all you are is the interface between the question and the answer, what value are you adding? If however, you can think and grow, and connect knowledge so that you can synthesize better answers faster and see the implications quicker, then you are the leader of the solution, not simply the mouthpiece for a service.
Summary
While most people fall into treating GenAI like a service to produce answers, validation, search results, or task work, there is another powerful application available to you. You can use GenAI to help you think better, and unlock more of your own natural cognitive power. When you use GenAI as a thinking partner, you gain access to not only more of your own critical thinking, but also more perspectives, and better recollection and understanding of the problems you are trying to solve and the work you are trying to do.
The next time you have a thorny problem to solve, instead of asking GenAI for the answer, why not start a conversation? Ask it:
Can you help me think through this problem to find an answer?
Give it a try. See how it goes. And let me know. I’d love to hear from you.
End Notes
-
I recommend reading the article, but the key thing here is ChatGPT is specifically instructed not to ask clarifying questions and to race ahead to provide answers. Gemini also does not want to provide transparency to its thinking. Claude in contrast is focused much more on mirroring and thoughtful conversation according to Forte. ↩︎
-
There is a catch: the AI needs to be prompted to act like a thinking partner. ChatGPT 5 and Gemini’s system prompts compel them to generate answers FOR you, not help you think. So it might take some back and forth to get them to be helpful. Claude in contrast is primed to interact this way in its prompt, at least as of this date. ↩︎
-
I have had absolutely the most success doing this with Anthropic’s Claude Sonnet 4.5 model. None of the others have been nearly as effective. ↩︎
-
I removed the detailed answers for brevity. I’ll leave it to you to work with your own agent to solve this riddle. ↩︎
-
Or your cultural equivalent, like a national anthem or nursery rhyme. ↩︎
Vibe Coding An Operating Budget
Working with Agents and Numbers
Do you want to know how I generated a CPA-approved budget from scratch in 2 hours for $1 in generative AI costs? Read on. In this post I share with you how I worked with Generative AI agents (GenAI, or agents) on that exact project. I want you to get a sense of how I work with GenAI to solve real problems.
And I have a confession to make. Despite the fact that I have two engineering degrees and eleven patents, I am not very good at accounting and finance. This still embarrasses me. I studied calculus, differential equations, and statistics in college. Accounting is mostly arithmetic for crying out loud!
Of course it’s not the basic math that is the problem. It is the relationships between expense categories and numbers and how they interact that I find confusing. Conceptually I understand what is going on, but translating that into specific, financial terms represented on a spreadsheet projected over time? Check please. I’d like to go back to studying calculus.
While I do know how to read a financial statement and balance sheet, putting together an operating budget from scratch for an organization I have never run? Hopefully you will cut me some slack if I share that I find that daunting. I’ve never done it.
This is where I turned to agents. I use them to guide me, but also to help me understand the process. I turned to my Vibe Coding environment because I wanted to create real excel sheets, with formulas included. You see, Python has a set of packages to create and modify excel spreadsheets.1
Therefore, my development plan is to use this “loop”:
- Give the agent specific directions about the nature of the project.
- Save progress and learnings in a MEMORY.md2 context file.
- Tell the agent my intention.
- Ask the agent how it recommends proceeding.
- Iterate with the agent until we have a working model we can present.
Most of the work will happen with Step 5, the iteration. Step 5 is the heart of Vibe Coding. I am having a conversation with the GenAI about not only how to proceed, but how to incrementally modify and improve what was implemented. The agent codes, I critique. That process looks like:
- Ask the agent to implement a change.
- Test the change.
- If the change succeeds, jump to step 6.
- If the change fails, or throws an error, copy and paste the error in the agent window and ask for help.
- Use the answer from the agent to jump back to step 1.
- Update all memory artifacts, and check in the change.
- Proceed to the next change.
How I Started
My first prompt started with this:
Good morning. I need your help to create an operating budget for a non-profit kids club. I have never done this before, so I need you to act as a supportive chief financial officer with a lot of experience working with non-profits. I want you to coach me through how to build this financial plan. Please generate a check list, or a plan we can follow to make sure we end up with an Excel spreadsheet in XLSX format that we can use for financial projections. Please ask me any clarifying questions before you proceed.
I always ask that last question in case I missed something vital for the agent to know.3 Sometimes the agent asks me questions, sometimes it just gets to work.
Asking the agent to check with you before it starts working is an example of human-agent collaboration.
Our first iteration produced four documents:
- Intake Questionnaire (10 sections of discovery questions)
- Excel Workbook (7 interconnected sheets with named ranges and formulas)
- Narrative Overview (“kid-friendly guide” to demystify budgeting)
- Workplan (detailed phase-by-phase checklist)
A Word About Execution Approvals
As the agent progresses, it will suggest work, and you will have to approve it before it can do anything. This is critical. The agent cannot execute commands on your computer unless you allow it.
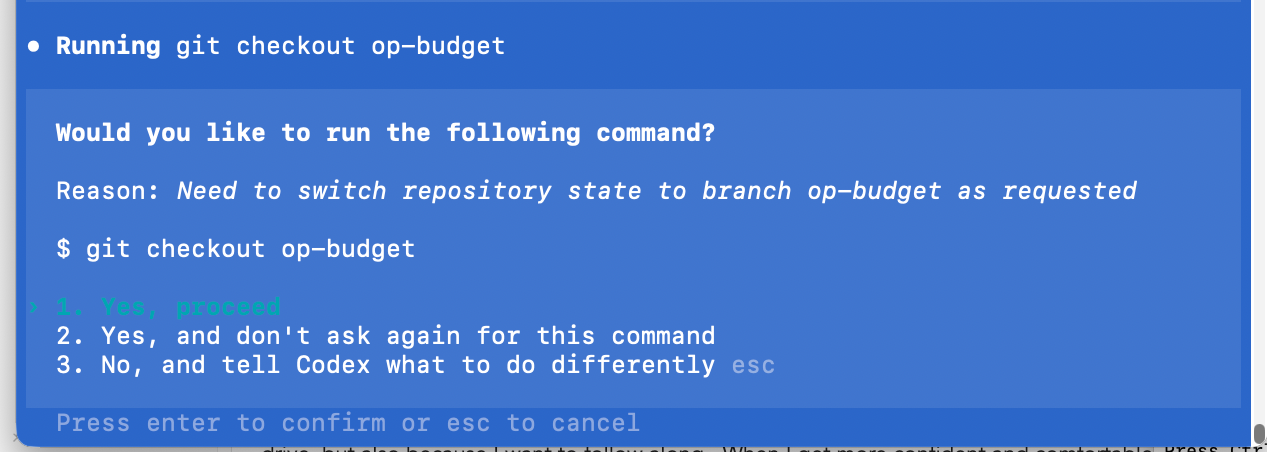
As you can see in the screenshot, you have three choices. They are:
Yes, proceedYes, and don't ask again for this command, andNo, and tell Codex what to do differently.
These translate into the following permissions:
- One time only
- Every time from now until the end of the session.
- Cancel and do something different.
I typically hit 1, the first time I go through a process. Not just because I’m paranoid about having an agent write files on my hard drive, but also because I want to follow along. When I get more confident and comfortable, I will hit 2, so the agent can proceed whether I am paying attention or not.
This is very risky - please make sure you know and understand what the agent is doing before you give it carte blanche to run commands on your machine.
I highly suggest during your first few vibe coding sessions, you only use 1 - a single execution approval so you can follow along. But once you get comfortable approving file creation and command execution in your command line environment, you are ready for the real magic to start.
The Magic
I presented the first draft of the operating budget to the club manager who I was helping. The screenshot below shows that the financial model assumed that the number of staff depended upon the number of kids. 12-15 kids per staff member. This sounded reasonable to me.

However, the manager pointed out that his club was staffed by zones. No kid can be unsupervised, and different rooms in the club serve different functions (Gym, Games, Art, Music, Computers etc). So instead of 15 kids per staff, the club had one staff for each active zone that day. The gym and the game room were always open, but the others depended upon the daily event programming.
This one change meant the spreadsheet would have to be rebuilt. Normally this is where most humans throw up their hands in frustration. However, redoing work is where vibe coding shines.
Armed with a better understanding of how the club actually operated, I could give the agent this prompt:
Hey, I just learned that the club is staffed differently than our assumptions. Instead of it being 15 kids per staff member, the club is staffed by zones. Can you modify the model and formulas for the new understanding?
The agent asked me questions which I answered. We went back and forth until it understood the requirements, and it updated the XLSX sheet. The results are on the screenshot below. You can see that the structure is radically different, but more importantly the formulas and interconnections had also been revised to integrate the new staffing model.
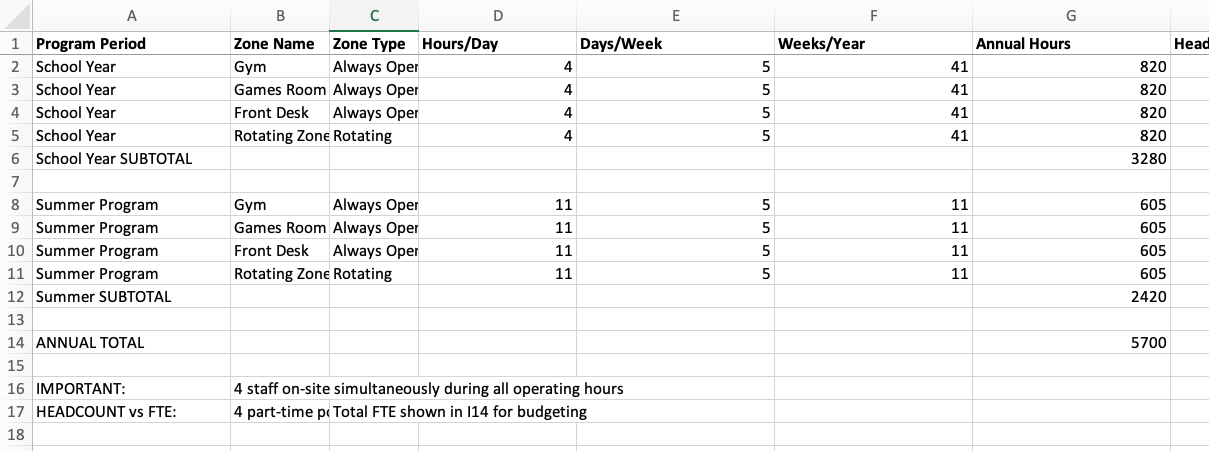
This was absolutely magic
Restructuring a financial spreadsheet, even one as trivial as this is always a pain. It’s the kind of drudgery that keeps me out of accounting. But in 90 seconds I had a brand new spreadsheet with the new assumptions ready to go.
For me, this is what makes Vibe Coding powerful and fun. The agent never complains about having to redo the work. Instead of getting stuck with a model someone poured a lot of time into, you can simply tell the agent to “fix it”, or “modify it”, or worse case, just start over.
And because I did not make the sheet, I had no emotional attachment to it either. I was like, “fine, rebuild it.”
By using git check-ins and pushes, we could back up each change (and recover them if we wanted to). We could fearlessly explore our way through the project check list, gathering data, costs, pricing, making adjustments, revising models as we learned.
Starting from absolutely nothing, in less than two hours we had an operating budget that a CPA reviewed and felt that it was clear, concise and made sense. It also happened to be mistake free. (I wasn’t sure that last part was going to happen - which is why I asked a professional to check our finished work.)
Summary
The moral of the story here is that agents can do three powerful things at the same time, which you don’t often find with humans.
- They can act as experts who coach you through a complex piece of work.
- They can actually do the work with you and for you.
- They don’t grumble if they have to redo the work.
Oh, and they are cheap. If you take the value of my time, the value of the club managers time, and the CPA time, we spent well over $100 an hour on this project in people. The agent? It cost about 10 cents an hour4. That’s right. At most it cost me $1 for that single project.
When I compare that to the thousands of dollars I spent on consultants who expected to direct my staff to do the work, the value I get here is insane. GenAI are qualified across a wide range of skills. They might hallucinate, but if you manage them like people, paying attention, following along, participating, you can complete quite a bit of work in a short amount of time at a very affordable price.
Why Not Use AI Inside the App?
You could probably create a spreadsheet in Google Docs, or directly in excel, and use Gemini, or Copilot to help you. I imagine you could build pretty much the exact same sheet I built. Why didn’t I do that?
Three reasons:
- Supporting Documentation.
- Context preservation.
- Version control.
If I only worked in Excel or Google Sheets, I would lose all the supporting documentation and the larger context. It is preserving the environment that makes me more productive. I want my disparate files together in the same place, I do not want to hunt them down across a myriad of applications. (Yes it still annoys me that I can only store Canva files in Canva.)
Finally, by using GitHub, I can get back to any moment in the project. Sure, Excel, and Google Sheets have versions - but only on a per document level. This approach lets me preserve everything in the folder at the time I check in. The Vibe Coding methodology gives me control over all my files, plus flexibility and transparency.
End Notes
-
Node.js also has libraries that can create, read, and write XLSX files. ↩︎
-
Sometimes this also called a memory artifact. ↩︎
-
One challenge I have been having with ChatGPT 5 lately is that it does not ask any questions, it races ahead with an imperfect and off-base understanding the requirements and I have to pull it back and sometimes start over. ↩︎
-
In oversimplified napkin math I took $20 a month for the service, divided by 30 days in the month, divide again by 8 hours in the day and that cost is about 08.33 per hour. I rounded up to 10 cents. ↩︎
Vibe Coding Python Virtual Environment

Vibe Coding with Python
Setting up Your Virtual Environment.
When I first started vibe coding, I asked the agent to make a program for me using Python. And away it went, and we wasted hours because I didn’t have the necessary packages installed on my machine. We spent a ton of time struggling to install the Python packages on my machine. I did not have this problem on Windows. Why was my Mac giving me so much grief? Because it turns out, Apple wanted to keep me safe. I don’t know when, but Apple moved away from allowing users to install Python packages systemwide, and they locked down the install that comes with the system. Now, the recommended way to install community plugins and packages is to set up a virtual environment.
What are packages? They are libraries of prebuilt code that solve common problems. For example, if you want to write CSV files (comma-separated value files which can be imported into MS Excel or Google Sheets), there’s a Python package for that. There is even a package to let you write real XLSX files! Yes, agents can create spreadsheets and even formulas, if you have the right library of packages.
But a Mac doesn’t come with those packages installed. And you cannot simply install them by running pip install package anymore. You get an annoying error. So, I want to save you some time and show you how I set up my virtual environment. A virtual environment creates a kind of sandbox where you can install almost anything you want, including even newer or updated versions of Python.
Setting up a virtual environment is simple, but it does add one more step to your daily vibe coding environment. You need to activate the virtual environment during each work session. I show you how to automate that as well.
So, the key steps to setting up a virtual environment that allows you to install all Python packages on macOS look like this:
1. Check if Python is Installed
python3 --version
A word about Python 3: Macs used to ship with Python 2, and for a while supported both Python 2 and 3 (they are not compatible). If you are curious about a bit of tech history and how nerds (coders) work through hard decisions, the story is at the end of this article.
2. Navigate to Your Project Folder
cd your-project-folder
3. Create a Virtual Environment
python3 -m venv venv
(The last “venv” is the name - you can call it anything, such as .venv). Note that when you run this command it will create a new folder at the root of your project with that name. So you will have your-project-folder/venv. This lets you set up different environments for different projects. For me, I set this up in my agentwork project folder so it persists across all my Vibe projects.
4. Activate the Virtual Environment
source venv/bin/activate
You’ll see (venv) appear at the start of your terminal prompt.
5. Install Packages as Needed
pip install package-name
6. Deactivate when Done
deactivate
The virtual environment keeps your project’s dependencies isolated from other Python projects on your system.
[!Note] You Can Always Ask AI This article in some ways is superfluous, because you can always ask AI how to do everything I tell you to do. What’s more, the advice you get is likely to be tailored to your specific machine and environment. However, I share this here because what the AI won’t tell you are my stories, perspective, or experience.
Now the only downside to this is that you likely need to fire up your virtual environment every time you want to work with Python, and you need to do this before you launch your CLI agent.
Consequently, I created a shell script that does all of this for me, and I assigned an alias to run that script. So when I start a terminal, I type:
goagents
And it sets up my development environment for me. This is how I did it.
Setting up Goagents
When working with Vibe Coding, I now have several things that need to be initialized every time I start a terminal window, so I asked GenAI to help me create a startup script. The prompt was something like:
can you create a shell script that I can run when I start a terminal to make sure my virtual python environment is running, and all my API keys are loaded from .envrc? Also, it would be great to know the status of the repository as well.
Claude produced a file called start-llm-session.sh:
#!/usr/bin/env sh
# Start an LLM dev session in this repo
#
# Usage (recommended):
#   source scripts/start-llm-session.sh
# or
#   . scripts/start-llm-session.sh
#
# Sourcing ensures env changes (direnv + .venv) persist in your shell.

set -e
set -u
set -o pipefail

TARGET_DIR="$HOME/agentwork"

echo "→ Changing directory to: $TARGET_DIR"
if ! cd "$TARGET_DIR" 2>/dev/null; then
  echo "! Error: directory not found: $TARGET_DIR" >&2
  # Return if sourced; exit if executed
  (return 1) 2>/dev/null || exit 1
fi

# Load direnv if available to bring in API keys from .envrc
if command -v direnv >/dev/null 2>&1; then
  if [ -f .envrc ]; then
    # Allow current dir (no-op if already allowed)
    direnv allow . >/dev/null 2>&1 || true
    # Detect shell flavor for correct export
    if [ -n "${ZSH_VERSION:-}" ]; then SHELL_FLAVOR="zsh";
    elif [ -n "${BASH_VERSION:-}" ]; then SHELL_FLAVOR="bash";
    else SHELL_FLAVOR="bash"; fi
    # Apply env to current shell
    # shellcheck disable=SC2046
    eval "$(direnv export "$SHELL_FLAVOR")"
    echo "✓ direnv loaded (.envrc)"
  else
    echo "! Note: .envrc not found; skipping direnv load"
  fi
else
  echo "! direnv not installed; skipping. Install: https://direnv.net/"
fi

# Activate Python virtual environment if present and not already active
if [ -z "${VIRTUAL_ENV:-}" ]; then
  if [ -f .venv/bin/activate ]; then
    # shellcheck disable=SC1091
    . .venv/bin/activate
    echo "✓ Python venv activated (.venv)"
  elif [ -f venv/bin/activate ]; then
    # shellcheck disable=SC1091
    . venv/bin/activate
    echo "✓ Python venv activated (venv)"
  else
    echo "! No .venv or venv found; skipping Python venv activation"
  fi
elif [ -n "${VIRTUAL_ENV:-}" ]; then
  echo "✓ Python venv already active: $VIRTUAL_ENV"
fi

# Quick sanity check for common API keys (do not print values)
check_var() {
  var_name="$1"
  if [ -n "${!var_name-}" ]; then
    printf "  • %s: set\n" "$var_name"
  else
    printf "  • %s: MISSING\n" "$var_name"
  fi
}

echo "→ Checking common API keys"
for v in OPENAI_API_KEY ANTHROPIC_API_KEY GOOGLE_API_KEY GEMINI_API_KEY OPENROUTER_API_KEY AZURE_OPENAI_API_KEY HUGGINGFACE_API_KEY; do
  # Indirect expansion compatible with sh via eval
  eval "__tmp=\"\${$v-}\""
  if [ -n "$__tmp" ]; then
    printf "  • %s: set\n" "$v"
  else
    printf "  • %s: MISSING\n" "$v"
  fi
done

# Show concise Git status
if command -v git >/dev/null 2>&1; then
  echo "→ Git status"
  git status -sb || true
else
  echo "! git not installed; skipping git status"
fi

echo "✓ Environment ready. Happy hacking!"

# Restore safe interactive shell settings
# (The strict settings above are useful during script execution,
#  but would cause the shell to exit on any command error if left on)
set +e
set +u
set +o pipefail
Warning: Directories When I started my agent project, I put it in
~/mcp/agentworkbut I have been telling you to put it in~/agentwork, so if you do use this script, make sure theTARGET_DIRon line 111 is set to the correct path. But if you get it wrong, this script will warn you.
In order to execute this script like a command, you do need to mark it as executable with the following command:
cd ~/agentwork
chmod +x ./scripts/start-llm-session.sh
Where does this file belong? I created a scripts folder under my agentwork folder. Therefore to run the script, when I open a terminal I type:
# Assume you are still in the agentwork directory
./scripts/start-llm-session.sh
Being a lazy developer, that’s too many characters, so I added the following line to the end of my .zshrc file. To be honest, you can ask your agent to do this for you. So I have three shortcuts: llmstart, agentstart, or goagent.
# === LLM session helper ===
goagent() { source ~/agentwork/scripts/start-llm-session.sh; }
alias llmstart='goagent'
alias agentstart='goagent'
# === End LLM helper ===
Again, make sure the source path points to the right file where you put your script.
Summary
You should now be able to fire up your development environment and launch the virtual environment for Python so you can install any packages or plugins you might need to start coding. This final bit of setup should now leave you in a position to begin solving all manner of cool problems. From now on my posts will focus more on the process of vibe coding and less on the technical details of what you should have installed. The truth is, even as I got to this point, most of the technical stuff you see in these last few posts was the result - not of my brilliance - but of me negotiating with my active agent. I told it what I wanted. It proposed a solution. I approved it to make those changes. It did, and then I tested it. We iterated until together we had a solution that worked for me. I feel confident that process will also work for you.
[!tip] The power of copy pasting errors When the AI does something for you that then causes an error, my fast fix is to copy the text out of the terminal window with the error message and paste it into the agent window with the prefix: “Hey I got this error” (paste in text from the other terminal window).
Note, after you go through this process, my best practice is to direct the agent to update its memory/context artifact, check in all changes, and push to origin. This takes a snapshot in time for all the changes, saves that state to our remote repository, creating a backup in the cloud. It also gives us a marker so we can return to this point if we need to.
The Strange yet Interesting History of Python
I am always asking, “how did it get to be like this?” (Etymology - the origin of word definitions is a favorite pastime of mine.) Consequently, in fact-checking this post, I unearthed the curious history of Python and the drama surrounding the switch from Python 2 to Python 3. I have been around tech long enough to remember when this was first announced and the decade-plus of drama that ensued. If you are interested in such things, please enjoy. If you are not, feel free to skip this section. You do not need to know any of this to vibe code. But I think it’s cool, so here is what I learned.
Python was created by a single guy in the late 1980s. His name is Guido van Rossum. He literally invented the language while working at a Dutch research institute. The first release was in 1991.
Python was extremely popular, but by the time Python 2 became the standard, certain kinds of bugs started popping up across thousands of applications and websites. The same kinds of bugs. Here is a brief list of the problems and how Python 3 moved to fix them:
1. Unicode/String Handling (the Big one)
- Python 2: Strings were bytes by default, Unicode was a mess (
u"string"vs"string") - Python 3: All strings are Unicode by default, bytes are explicit
- This fixed a huge source of bugs in international applications and web development
2. Integer Division
- Python 2:
5 / 2 = 2(truncated) - Python 3:
5 / 2 = 2.5(true division), use//for integer division - Python 2’s behavior was a common source of subtle bugs
3. Iterators Everywhere
range(),zip(),map(),dict.keys()etc. return iterators instead of lists- More memory efficient, but broke a lot of code
4. Stricter Error Handling
- Removed implicit type coercion that caused bugs
- Better exception chaining
But the real shock was how the creator, Guido van Rossum, decided to implement these changes. In 2008, they launched Python 3. Rossum had decided to break backward compatibility intentionally to fix fundamental design flaws. No other major web programming language had taken that approach. JavaScript, PHP, and others maintained what is called backward compatibility. The real surprise was that most developers ignored Python 3. For years. It was not until 2014, when Rossum and his team announced the end of life for Python 2 in 2020 (giving everyone a 6-year heads up), that people actually started to switch. The lack of backward compatibility was hugely controversial.
How did Rossum have the power to make such a decision? That, in my mind, is the real story.
Rossum’s Authority: The “BDFL” Model
Guido held the title “Benevolent Dictator For Life” (BDFL) - a half-joking, half-serious title in the Python community. This meant:
- He had final say on all major Python decisions
- The community would debate, propose, vote on PEPs (Python Enhancement Proposals)
- But ultimately, Guido could approve or reject anything
- His vision shaped the language philosophy (“There should be one obvious way to do it”)
Why People Accepted This
- He created it - hard to argue with the inventor
- Good track record - Python became hugely successful under his leadership
- Open but decisive - He listened to community input but could break deadlocks
- No corporate ownership - Python was open-source, not controlled by a company
The Twist: He Stepped Down
In 2018, after a particularly contentious debate (about the “walrus operator” :=), Guido stepped down as BDFL. He said he was tired of the pressure and conflict.
Now Python is governed by a Steering Council elected by core developers - a more democratic model.
The Irony
The Python 2→3 decision was possible because of the BDFL model. A committee might never have had the guts to break backward compatibility that drastically. For better or worse, that benevolent dictatorship enabled bold moves.
But what is a Walrus Operator?
It is a part of Python syntax but it is also a fascinating piece of Python community drama!
The := operator (officially “assignment expression”) lets you assign and use a value in one line:
# Without walrus
n = len(items)
if n > 10:
    print(f"Too many items: {n}")

# With walrus
if (n := len(items)) > 10:
    print(f"Too many items: {n}")
The Conflict (PEP 572, 2018)
The Python community was deeply divided:
Pro-walrus camp:
- More concise, especially in loops and comprehensions
- Avoids redundant function calls
- Common pattern in other languages (C, Go)
Anti-walrus camp:
- Violates “There should be one obvious way to do it”
- Hurts readability - assignment hidden inside expressions
- Encourages overly clever one-liners
- “Too much like C” (Python had avoided this for 27 years)
The debate got ugly: Personal attacks, heated mailing list threads, accusations of elitism vs. populism.
How It Was Decided
July 2018: Guido approved PEP 572 despite significant opposition.
Days later: Guido announced he was stepping down as BDFL, saying:
“I’m tired of the weight of being the final decision-maker… I’m basically giving myself a permanent vacation from being BDFL.”
The Aftermath
- The walrus operator was added to Python 3.8 (2019)
- Python transitioned to the Steering Council model
- The controversy showed even Guido couldn’t make everyone happy
The irony: The walrus operator works fine, many people use it, but it literally cost Python its creator as leader. That’s how contentious language design can get!
Getting to Know Markdown
Getting to Know Markdown
One of the first problems I ran into when I switched to a command line mode of working with AI was surprisingly simple but profound. The terminal has very limited text display capabilities. Whereas the desktop apps can render beautiful WYSIWYG (What You See Is What You Get) blocks of text, the terminal mode can’t. While the desktop apps and web pages do look beautiful, they mask a pain point someone like me runs into every day. When I copy text out of ChatGPT and paste it somewhere else, that beautiful formatting always breaks. It is so unbelievably annoying. I get extra blank lines, broken bullet lists, strange formatting full of emojis, dividing lines, and improper bold fonts instead of headers. Not only does it look bad when pasted, the structure of the document is messed up.
Ugh.
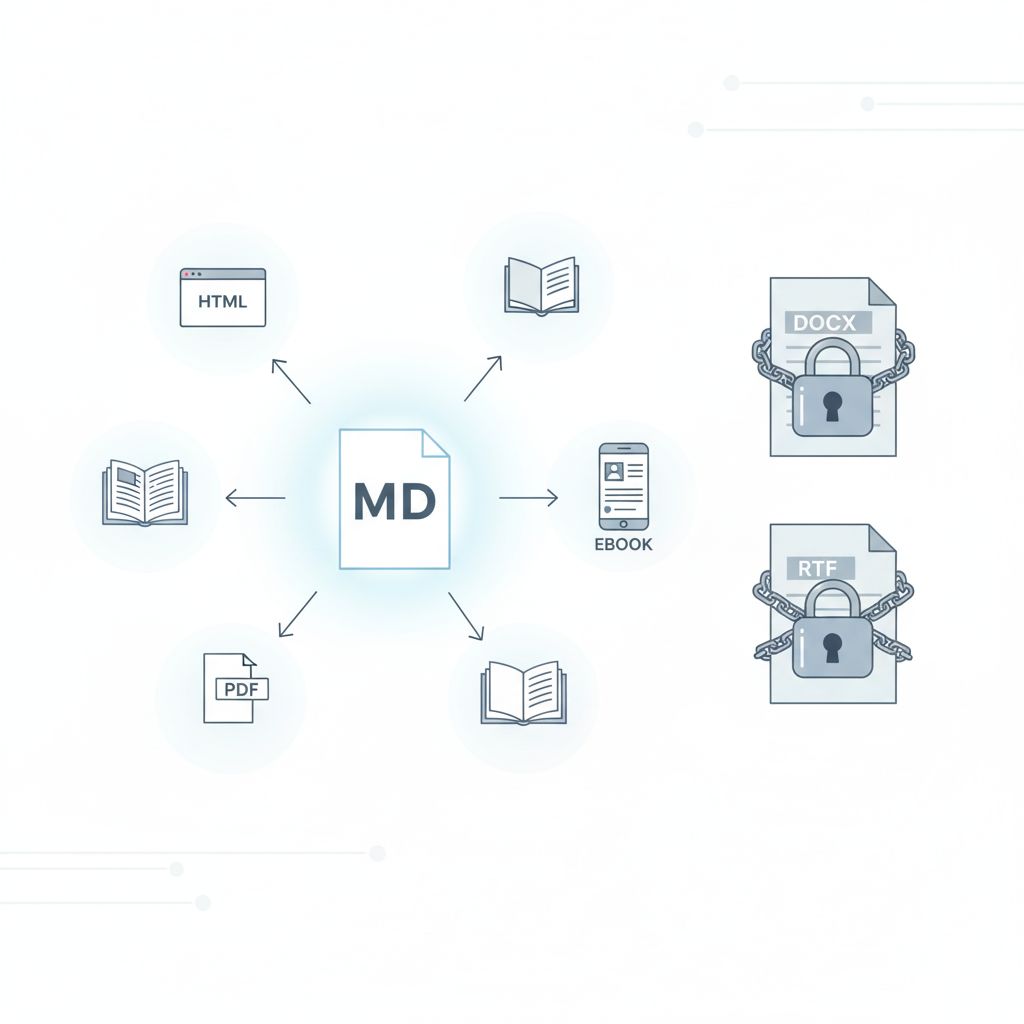
So what is the answer? Well, it turns out there is a simple and elegant solution to this problem. It is called markdown. Markdown is a way of working with plain text files that preserves the author’s intent while at the same time keeping the file human-readable. This is a massive improvement. And guess what? Your agent can write markdown files for you. No copying and pasting. No broken formatting. And markdown files can be easily converted into HTML or almost any other kind of printable, displayable format without ruining the formatting (most of the time).
I swear, once you get used to markdown, you won’t want to go back to anything else.
In fact, markdown has become so prevalent that Google Docs now supports paste from markdown and copy as markdown commands on the edit menu. And when typing, you can type in a Google doc like you are writing in a markdown text file and the editor will automagically format everything for you.1
Yes, your life as a vibe coder will be improved immeasurably by learning markdown.
So what is markdown and why does it exist? Markdown is one of a family of “self-documenting” datafile types. What are self-documenting files?
To answer that question, let me tell you a story. I remember this apocryphal story about some NASA engineers looking for data from a space probe. Could have been Voyager. What they found was a phone book-size printout loaded with 1s and 0s. No one knew how to decode it. Only by finding a report from one of the original project engineers could they decipher the “saved data.” This story, and many just like it, prompted NASA to push for formats that were self-documenting. This meant years later, anyone could look at the data and figure out what was in it, how it was structured, and how it was meant to be used. Preserving this context is crucial for longevity and utility of your applications.
Here’s a real story from my own experience. When I worked at Rainbow Studios, we paid a lot of money for a special network storage hard drive where we backed up our code (like Git, but before Git). When THQ sold the studio and its assets to Nordic, Nordic accessed all the source code in the archive. The “intellectual property” is what they had purchased. What they really wanted, however, was the ability to make the video games. It turned out the source code by itself was useless. Why? Because the code made reference to libraries and systems that no longer existed. Some games were made for different versions of DirectX (a graphics library made by Microsoft for Windows and Xbox) that was no longer available or did not run on modern graphics cards. In short, Nordic needed more than the source code. They needed the entire environment around the code. Like the mythical NASA engineers who found an old report, Nordic was able to find the lead engineers who made the games. Rainbow had a policy of archiving the physical machine that built the version of the game that eventually was published. The entire machine was whisked away and saved in the engineer’s closet. Only by getting back the full context of the work could Nordic build the games and from there begin the work of updating them for the market.
I tell you both of those stories because preserving context and self-documentation are crucial for long-term project success.
Until the advent of LLMs, most projects used source code, configuration files, and database files, but the project context information was stored somewhere else. Machine-readable files and human-readable files were rarely kept together.
ChatGPT, Claude, and Gemini have changed all of that. Now, you can (and should) direct your LLM to create an artifact. Specifically, you want them to create a memory artifact. And you want them to write this in markdown format.
I have told you why you want markdown, but what is markdown?
Markdown was created in 2004 by John Gruber with significant collaboration from Aaron Swartz. Their goal was to make a human-readable text file that more or less looked like what the author meant, but was easily converted to HTML (hypertext markup language, the files that make up most web pages). If you open an HTML document, most of the time they are simply unreadable. You can probably decipher an HTML page, but read it? Good luck.
Gruber and Swartz wanted to be able to write files that a person could read with no special assistance, but a simple program could convert the file into HTML, and the style of that document could be modified later, on the fly.
Your markdown is meant to capture the author’s intent, not the style. Let me give you some examples to make it clearer.
Here is a sample of a short story in typical HTML:
<h3 class="story-header">A Short Story</h3><div class="story"><p>The <em>quick</em> brown <bold>fox</bold> jumped over the lazy dog.</p><br/></div>
There are as many, or more, characters for markup in that text than the actual text itself. When you add in document structure, CSS, embedded JavaScript, you are often facing a complete hash of characters and symbols that absolutely obscure and bury the content.
Here’s what that looks like in markdown:
### A Short Story
The _quick_ brown **fox** jumped over the lazy dog.
The point is that a markdown file allows an author to quickly write out what they intend, in a way that you can later open that file with any text editor (VS Code, Sublime, BBEdit, Textastic, nano, vim, the list is endless) and just read it. If you happen to have a powerful markdown editor, like say Obsidian, iA Writer, Byword (again the list is countless), you can actually see the text presented almost like it would be on a web page, like this:
A Short Story
The quick brown fox jumped over the lazy dog.
Markdown makes a new kind of configuration file possible. A file that preserves the story of how you are working with the AI, in a format both you and the LLM can understand. So how do you work with markdown? Let’s dig in.
How to Learn Markdown
The best advice I can give you is to start using it. Just play with it. There are countless tutorials, many apps, but the best way is to have your agent generate a memory artifact, then read it. You will pick up some tips and clues on how to work with it.
I should point out that Obsidian, the software that runs my digital second brain, is almost entirely markdown-based.
You know what else? Google Docs now supports paste from markdown and copy as markdown, making moving content to and from Google even easier.
Markdown has become a sort of de facto method for moving information around while also communicating how the author would like it presented. Every blog publishing platform I use accepts Markdown (except Medium.com - come on guys!)
Here are a few resources for you to try if you want to learn how to work with markdown:
- https://www.markdownguide.org/basic-syntax/
- https://commonmark.org/help/tutorial/
- https://rgbstudios.org/blog/markdown-guide
And of course, you can always ask ChatGPT, Claude, or Gemini to teach you.
[!note] Markdown for Skills I should also point out that all of my Claude skills are also in markdown format. Markdown turns out to be extremely useful for working in vibe coding.
Summary
The main takeaway is that as you start vibe-coding and building out projects, one of the most important kinds of files you will want to direct your agent to create is a memory artifact, and you will want to create this in markdown format.
You want to learn markdown basics so you can read, edit, and create your own markdown files. Markdown lets us move configuration out of the impenetrable dense formats used for coding into something more human-friendly and understandable.
And full disclosure, once you get used to markdown, using a tool like Obsidian to organize your knowledge becomes second nature. In fact, the first skill I taught Claude Code to use was how to create markdown notes for my Obsidian vault using my templates. Claude can now extend my “knowledge base” directly, and that is extremely cool. No copy and pasting. No fiddling with backlinks or YAML properties. I can simply tell it, “make a notecard” and it will generate the proper note, in the proper format, using markdown and voila, I have another thought train. As Tiago Forte said,
“Knowledge is the only resource that gets better and more valuable the more it multiplies.” (Tiago Forte, Building a Second Brain)
Bonus - The Core Features I Use in Markdown
There are a variety of markdown “flavors” (it’s open source, so different people interpret it differently), but here is a list of my core markdown codes. (What would you call them? I don’t know.) This is what I use when writing almost everything, including this blog post.
# Level one header (For Titles)
## Level two header (For Sections)
### Level three header (For sub-sections)
Some blog systems do not support headers below level 2 or 3.

## Character Formatting
I like to use double asterisks for **bold**.  And you can use a single asterisk for *italics*.  However, personally I prefer to use underscores for _italics_.

You can also format some words as `code` by surrounding it with backticks.  Three backticks will mark a code block (that is how I am sharing this with you, inside a code block.)

Obsidian supports additional formats like highlighting and strikethrough, but I avoid those because they are not widely supported, and underline is not supported because it too often looks like a hyperlink.  Remember markdown was made for the web, not for print.

## Lists
The next most important thing for me are unordered lists and ordered lists. You can use an asterisk or a hyphen to start an unordered list. I prefer hyphens.

- Item one
- Item two
- Item three

Ordered lists are even simpler. Just enter numbers:

1. Item A
2. Item B
3. Item C

Allegedly, when your text is converted to HTML, the numbers will be adjusted correctly. However, I tend to make sure they increment correctly by hand. I'm a noodge that way.

Finally, I use the blockquote for quotes or callouts.

> this is a block quote
Those are my basics. I will sometimes use footnotes (or endnotes), but they are not widely supported yet.
End Notes
-
In order to use markdown in Google Docs, you may have to activate it. You can do this by going to Tools → Preferences and you will see
Enable Markdownas one of the check boxes. Select it to activate the markdown mode. ↩︎
Model Context Protocol GO v2
Unleashing Your Agent
I will admit that I have taken a somewhat roundabout path to get to where I wanted to go, but I have been trying to avoid the trap of the expert, namely that you know what I know. You could easily get here on your own by asking Claude “How do I setup a Model Context Protocol server on my machine?” And it will walk you through the steps. But what I wanted to do was share how one human (me) approached this. I believe that when we share our stories, it makes it easier to believe we could do the same.
So here is where I think we are:
- You have a git repository for your AI work. Think of this as the cloud backup for your work.
- You have cloned this repository on your local machine.
- You have installed node.js
- You have installed Claude Code (and maybe a few other AI agents)
At this point, you are now ready to tackle two interesting things:
- MCPs
- Skills
This article will touch on MCPs.
What is an MCP?
MCP in this context stands for Model Context Protocol, and it is essentially a standard to allow agent-like capabilities for Large Language Models. It tells Claude or ChatGPT how to talk to another service. There are two I personally have gotten the most use out of:
- Filesystem access
- Google Docs
I wish there was a functioning Google Drive connector, but it turns out Google Drive is not one thing but a layer of paint over a messy, discordant collection of applications. Kudos to Google for making that appear seamless to the user. Boo to Google for not making it equally seamless under the hood for lazy developers like me.
So what is an MCP? Think of it like a USB connector, but instead of connecting devices to your computer, it connects your AI Agent to your data and tools. It was launched by Anthropic in Nov 2024 as an open source standard. Claude believes the motivations for launching this standard were:
- Modern AI models are incredibly powerful, but they’re often isolated from data - trapped behind information silos and legacy systems
- Every company was building custom connectors for each data source
- There was no standardized way for AI to access tools and data securely
Key Design Inspiration: MCP deliberately reuses concepts from the Language Server Protocol (LSP) - the same protocol that powers code intelligence in VS Code and other modern IDEs. If LSP worked for standardizing how IDEs understand code, why not apply similar concepts to how AI systems access data?
Before MCP:
ChatGPT Plugin → only works with ChatGPT
Custom Claude Integration → only works with Claude
Copilot Extension → only works with Copilot
With MCP:
One MCP Server → works with Claude, ChatGPT, Gemini, etc.
MCPs in principle are universal.
[!note] At no point did Claude mention Skynet so it must be safe right?
Long and short, an MCP is how an AI agent on your machine can get out of its sandbox and start doing actual work for you.
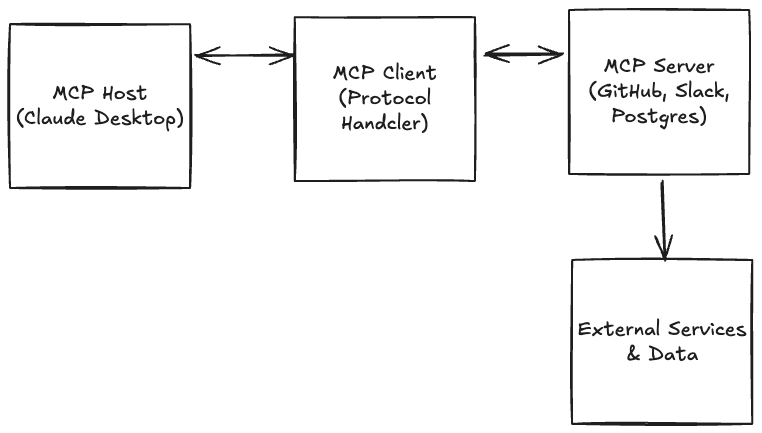
There are four parts to an MCP: the MCP Host, the MCP Client, and the MCP Server (See the TLDR for more details.)
What You Need to Make MCP Work
If you notice, I have walked you through most of these already. You need:
1. An MCP Host Application
- Claude Desktop (macOS or Windows) ✅
- Claude Code (CLI tool) ✅
- Other compatible clients (Cursor, Zed, etc.)
2. Node.js (for most MCP servers)
- Used to run JavaScript/TypeScript-based servers with
npx✅ - Verify:
node --version✅
3. Python (for Python-based servers)
- Used with
uvxorpip✖ - Verify:
python --version
I did not show you how to install Python (yet). I’ll touch on that shortly.
In addition to the environment, you will likely need API Keys or Access Tokens. I highly suggest you ask your LLM for specific directions on how to get these. I will tell you the access keys for Google are a PAIN to generate. It is a highly convoluted process. Also, some platforms (like Medium) have stopped giving out API keys to cut down on AI Spam Abuse1. One system you will likely want to get a token from is GitHub, as this makes running git commands in Claude Code easier.
A Word About Token Safety
You do not want to save your tokens in your git repository. To get around this, you can use a special file called .gitignore. It is in your project root, and because it starts with a dot “.” it will be invisible by default. When you use a dual pane file manager like Marta or Commander Pro, you can easily toggle a switch that says “show hidden files.” Both the macOS Finder and Windows Explorer also have the option to display hidden files. I am fairly confident VS Code shows hidden files automatically because developers need to edit them so often.
Anywho, the process of protecting your keys (there are a bunch of ways to do this) is to use direnv with .gitignore. Here’s how I did it:
1. Install direnv
cd ~/agentwork
brew install direnv
This will install the application. You will get a file in the root of your project called .envrc.example. It looks like this:
# direnv configuration (copy to .envrc and run: direnv allow)

# Option 1: Set variables directly (recommended)
# Add any project-scoped secrets below
# export ANTHROPIC_API_KEY="changeme"
# export ELEVENLABS_API_KEY="changeme"

# Option 2: Load from a local .env file (kept out of Git)
# Uncomment to auto-load a .env file if present
# dotenv_if_exists

# Optional: auto-activate Python venv if you use one
# layout python
# or specify: layout python3

# Optional: Node project setup (uncomment if helpful)
# use node

# Notes
# - Never commit your real .envrc (it's gitignored).
# - Run `direnv reload` after changes, or simply re-enter the directory.
The idea is to edit this file so that it looks the way you want (with no API keys) like this:
# direnv configuration (copy to .envrc and run: direnv allow)
export OPENAI_API_KEY="changeme"
export READWISE_TOKEN="REPLACEME"
export ANTHROPIC_API_KEY="changeme"
export ELEVENLABS_API_KEY="changeme"
As the file says, copy this file to .envrc and then edit that file so it looks something like:
cp .envrc.example .envrc
Then edit the .gitignore file so that it has these lines. This will prevent git from trying to send these files to the server:
# Environment & OS files
.envrc
.DS_Store
For reference, mine looks like this:
# Node & package managers
node_modules/
package-lock.json
pnpm-lock.yaml
yarn.lock

# Python virtual envs
.venv/
venv/

# Logs & temp
gptsh.log
logs/
tmp/

# Environment & OS files
.env
.env.*
.envrc
.DS_Store
I don’t want to track temporary files, log files, or my virtual environment files. Now you can go back and edit your .envrc file and set your API keys by replacing the “changeme” or “REPLACEME” text with your unique key. If you tell the AI that it can find its access token (aka API Key) in an environment variable named ANTHROPIC_API_KEY, it will use that in scripts it creates so that you don’t have to login.
Now to make use of these settings, all you have to do is run direnv in a command line, and your keys, which only exist on your local machine, will be loaded into environment memory and the command line tools will be able to access them. Pretty cool right? Okay, not that cool, but useful.
Practical Example
Here is an example of how I used this recently. I do most of my digital reading on the Kindle. However, I do all of my Bible study using Olive Tree Bible Study app. I have hundreds of highlights in Olive Tree. Readwise does not support pulling highlights out of Olive Tree. But Olive Tree supports exporting highlights. I was able to get an API key from Readwise, then have Claude build a Python application which converted my Olive Tree highlights into a format ideal for Readwise and voila, I pushed 600+ highlights into my Readwise account, and lo and behold they “automagically” also showed up in Obsidian. This is now an automation, so I can direct Claude to convert Bible study highlights whenever I want without having to login every time. I like this. Me gusta. I am convinced that is cool.
Now, back to setting up an MCP.
Letting Claude Edit Your Files
I believe Claude Desktop now supports having a built-in file system manager. You have to go to the Developer Tab in Settings.

Claude Development Settings
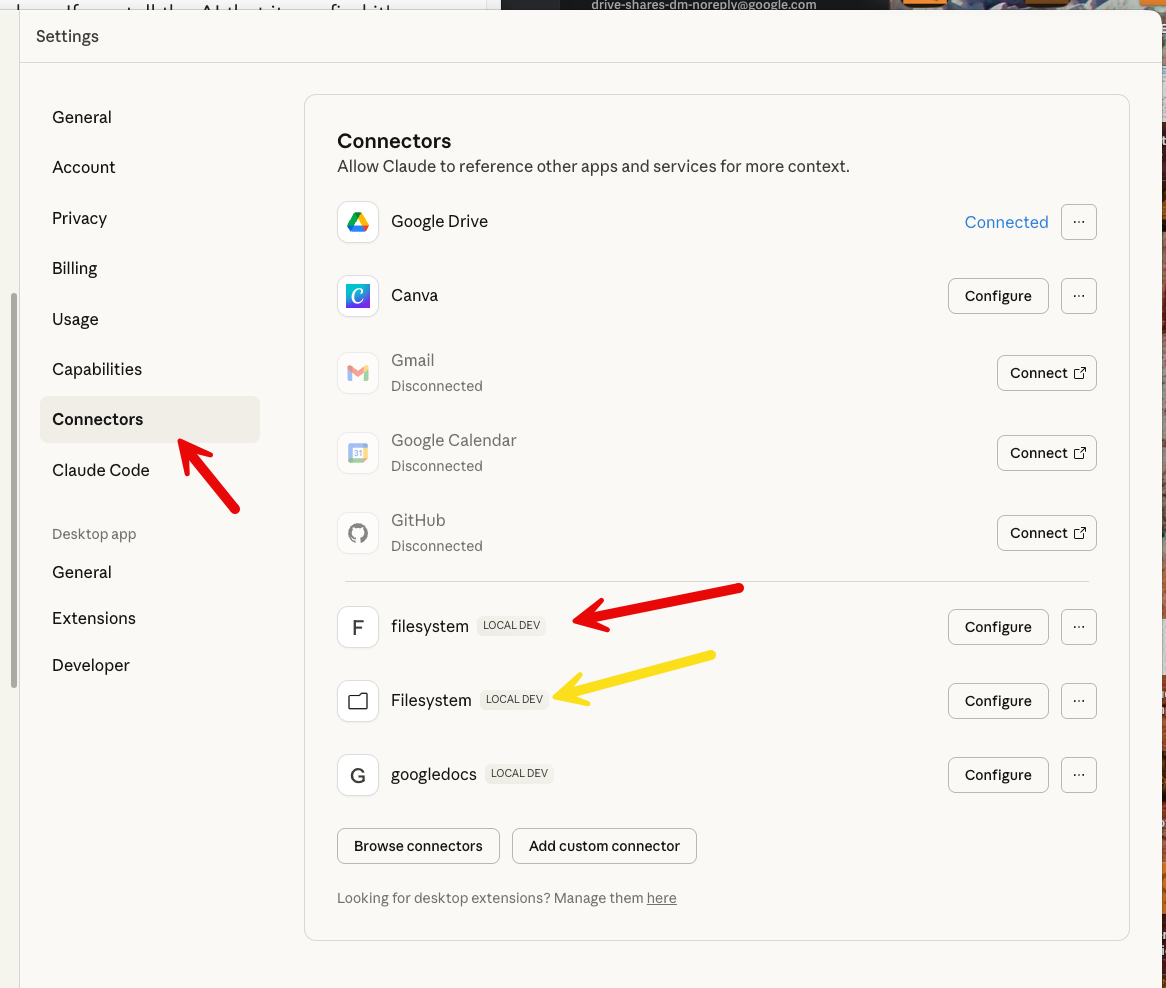
In the weird and wonderful way of development, there are two ways to get to this setting. And I have TWO filesystem connectors because one I set up myself and one comes with Claude. I’ll show you how I set up the third-party file system MCP (this was available before Anthropic bundled it with the app). I show it because it’s still a good example.
1 Setup Your Config File
You can find Claude’s Desktop configuration file here:
~/Library/Application Support/Claude/claude_desktop_config.json
[!note] The
~/Libraryfolder is hidden by default by macOS even though it does not start with a dot.
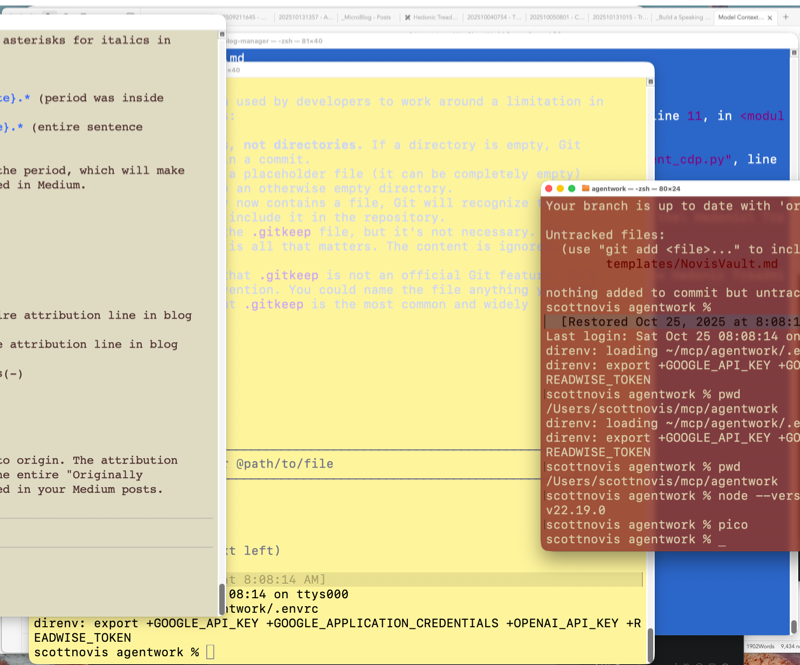
If you do not have a claude_desktop_config.json file then you can create one using the following commands in a terminal window. And you might want to get used to having lots of terminal windows open. I use the formatting preferences to give them different colors. That way I know what agent is running in which window. Blue for Gemini, Tan for Claude, Yellow/White for ChatGPT. The red window is where I enter commands and work.
# Navigate to the directory
cd ~/Library/Application\ Support/Claude

# Create the file if it doesn't exist
touch claude_desktop_config.json

# Also just make sure you have node installed (should be v22.x at the time of this writing)
node --version
Once you have created the file using touch, you can edit it. I learned how to use vim way back in the 80s so it is my go-to editor, but many people like nano and pico. All three are available in a macOS terminal. Once you have the file, you issue the command:
nano claude_desktop_config.json
Then you can copy and paste this into your config file:
{
  "mcpServers": {
    "filesystem": {
      "command": "npx",
      "args": [
        "-y",
        "@modelcontextprotocol/server-filesystem",
        "/Users/YOUR_USERNAME/Desktop",
        "/Users/YOUR_USERNAME/Downloads"
      ]
    }
  }
}
You would replace YOUR_USERNAME with, well, your actual username. Then type Ctrl-O to save the file and then Ctrl-X to quit. The shortcut keys are visible at the bottom of the nano screen.
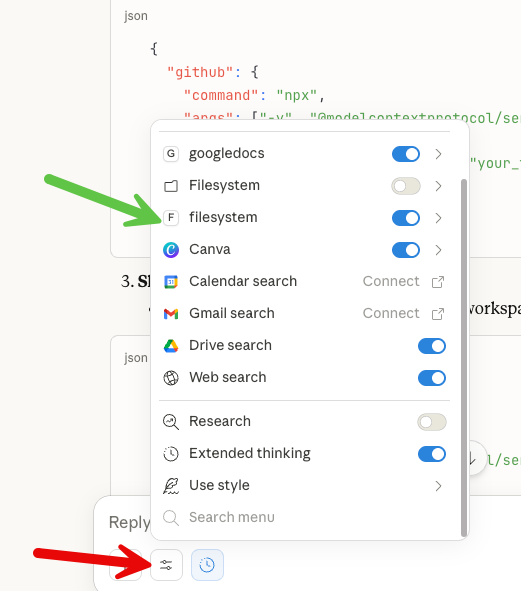
Now restart Claude and check in the settings box on your chat window, and you should now see filesystem available.
Now comes the crazy part. You can direct Claude to actually write files to your local machine. Instead of creating an artifact that you have to copy and paste, you can tell Claude directly to write the file. Also, you can tell it to find and read a file. Welcome to a whole new world.
I’m going to stop there for today.
Summary
You learned how to install a basic MCP into Claude you can use to access your file system from the desktop app. You also learned how to protect your API keys and put them in your environment so Claude/Codex/GeminiCLI can access them safely. And we set up Claude Desktop to use a fun MCP server to read and edit local files.
[!warning] If you ran into trouble You can ask Claude to help you debug it. Share any error messages you are getting during this process. You may find that it is better to debug with Claude Code (because it already) has file system access and can help figure out what you did wrong or what needs fixing on your system. The AIs are shockingly useful in helping you get the AI running.
The combination of MCP and file system access is super powerful. Next time we’ll dig into setting up your Python environment so you can begin vibe coding in earnest.
TLDR;
-
MCP Host: The application users interact with (Claude Desktop, IDEs like Cursor, chat interfaces)
- Manages MCP clients
- Enforces security policies
- Handles user consent and authorization
-
MCP Client: The connector within the host
- Maintains 1:1 stateful sessions with MCP servers
- Implements the client side of the protocol
- Acts like an agent deciding which tools to use
-
MCP Server: Exposes tools, data, and prompts
- Can be local (running on your machine) or remote (cloud-hosted)
- Provides capabilities to the AI through a standardized interface
- Handles the actual interaction with data sources/APIs
Communication: MCP uses JSON-RPC 2.0 for message passing, similar to LSP.
EndNotes
-
Annoying, but I understand it. ↩︎
Giving Your Vibe Code Setup Continuity v2
Giving Your CLI Agent Some Memory
Now that we have a functional Claude Code environment, you can easily install Codex AI (ChatGPT’s command line tool) and Gemini CLI. How? Ask Claude how to do it, of course. But before we dive too far down this road, there are a few more setup things we should do.
Let’s create an environment where you can do some “real” work. By this I mean that Claude Code has the ability to read and write files on your local computer. What’s more (with permission), Claude Code can also run shell commands. This can be extraordinarily powerful, as hopefully you will soon see.
Setting Up a Memory File
There are a few files you’ll want to add to your agent work directory. These files give Claude Code standing directions—they’re read every time the app starts up. Some files also act as contextual memory artifacts. Claude Code doesn’t keep memory from run to run, so these files act as quick-start guides when you have to quit the app and restart it.
As an example of working faster with knowledge, I asked Claude, “What does each of these files do?” And here’s the answer:
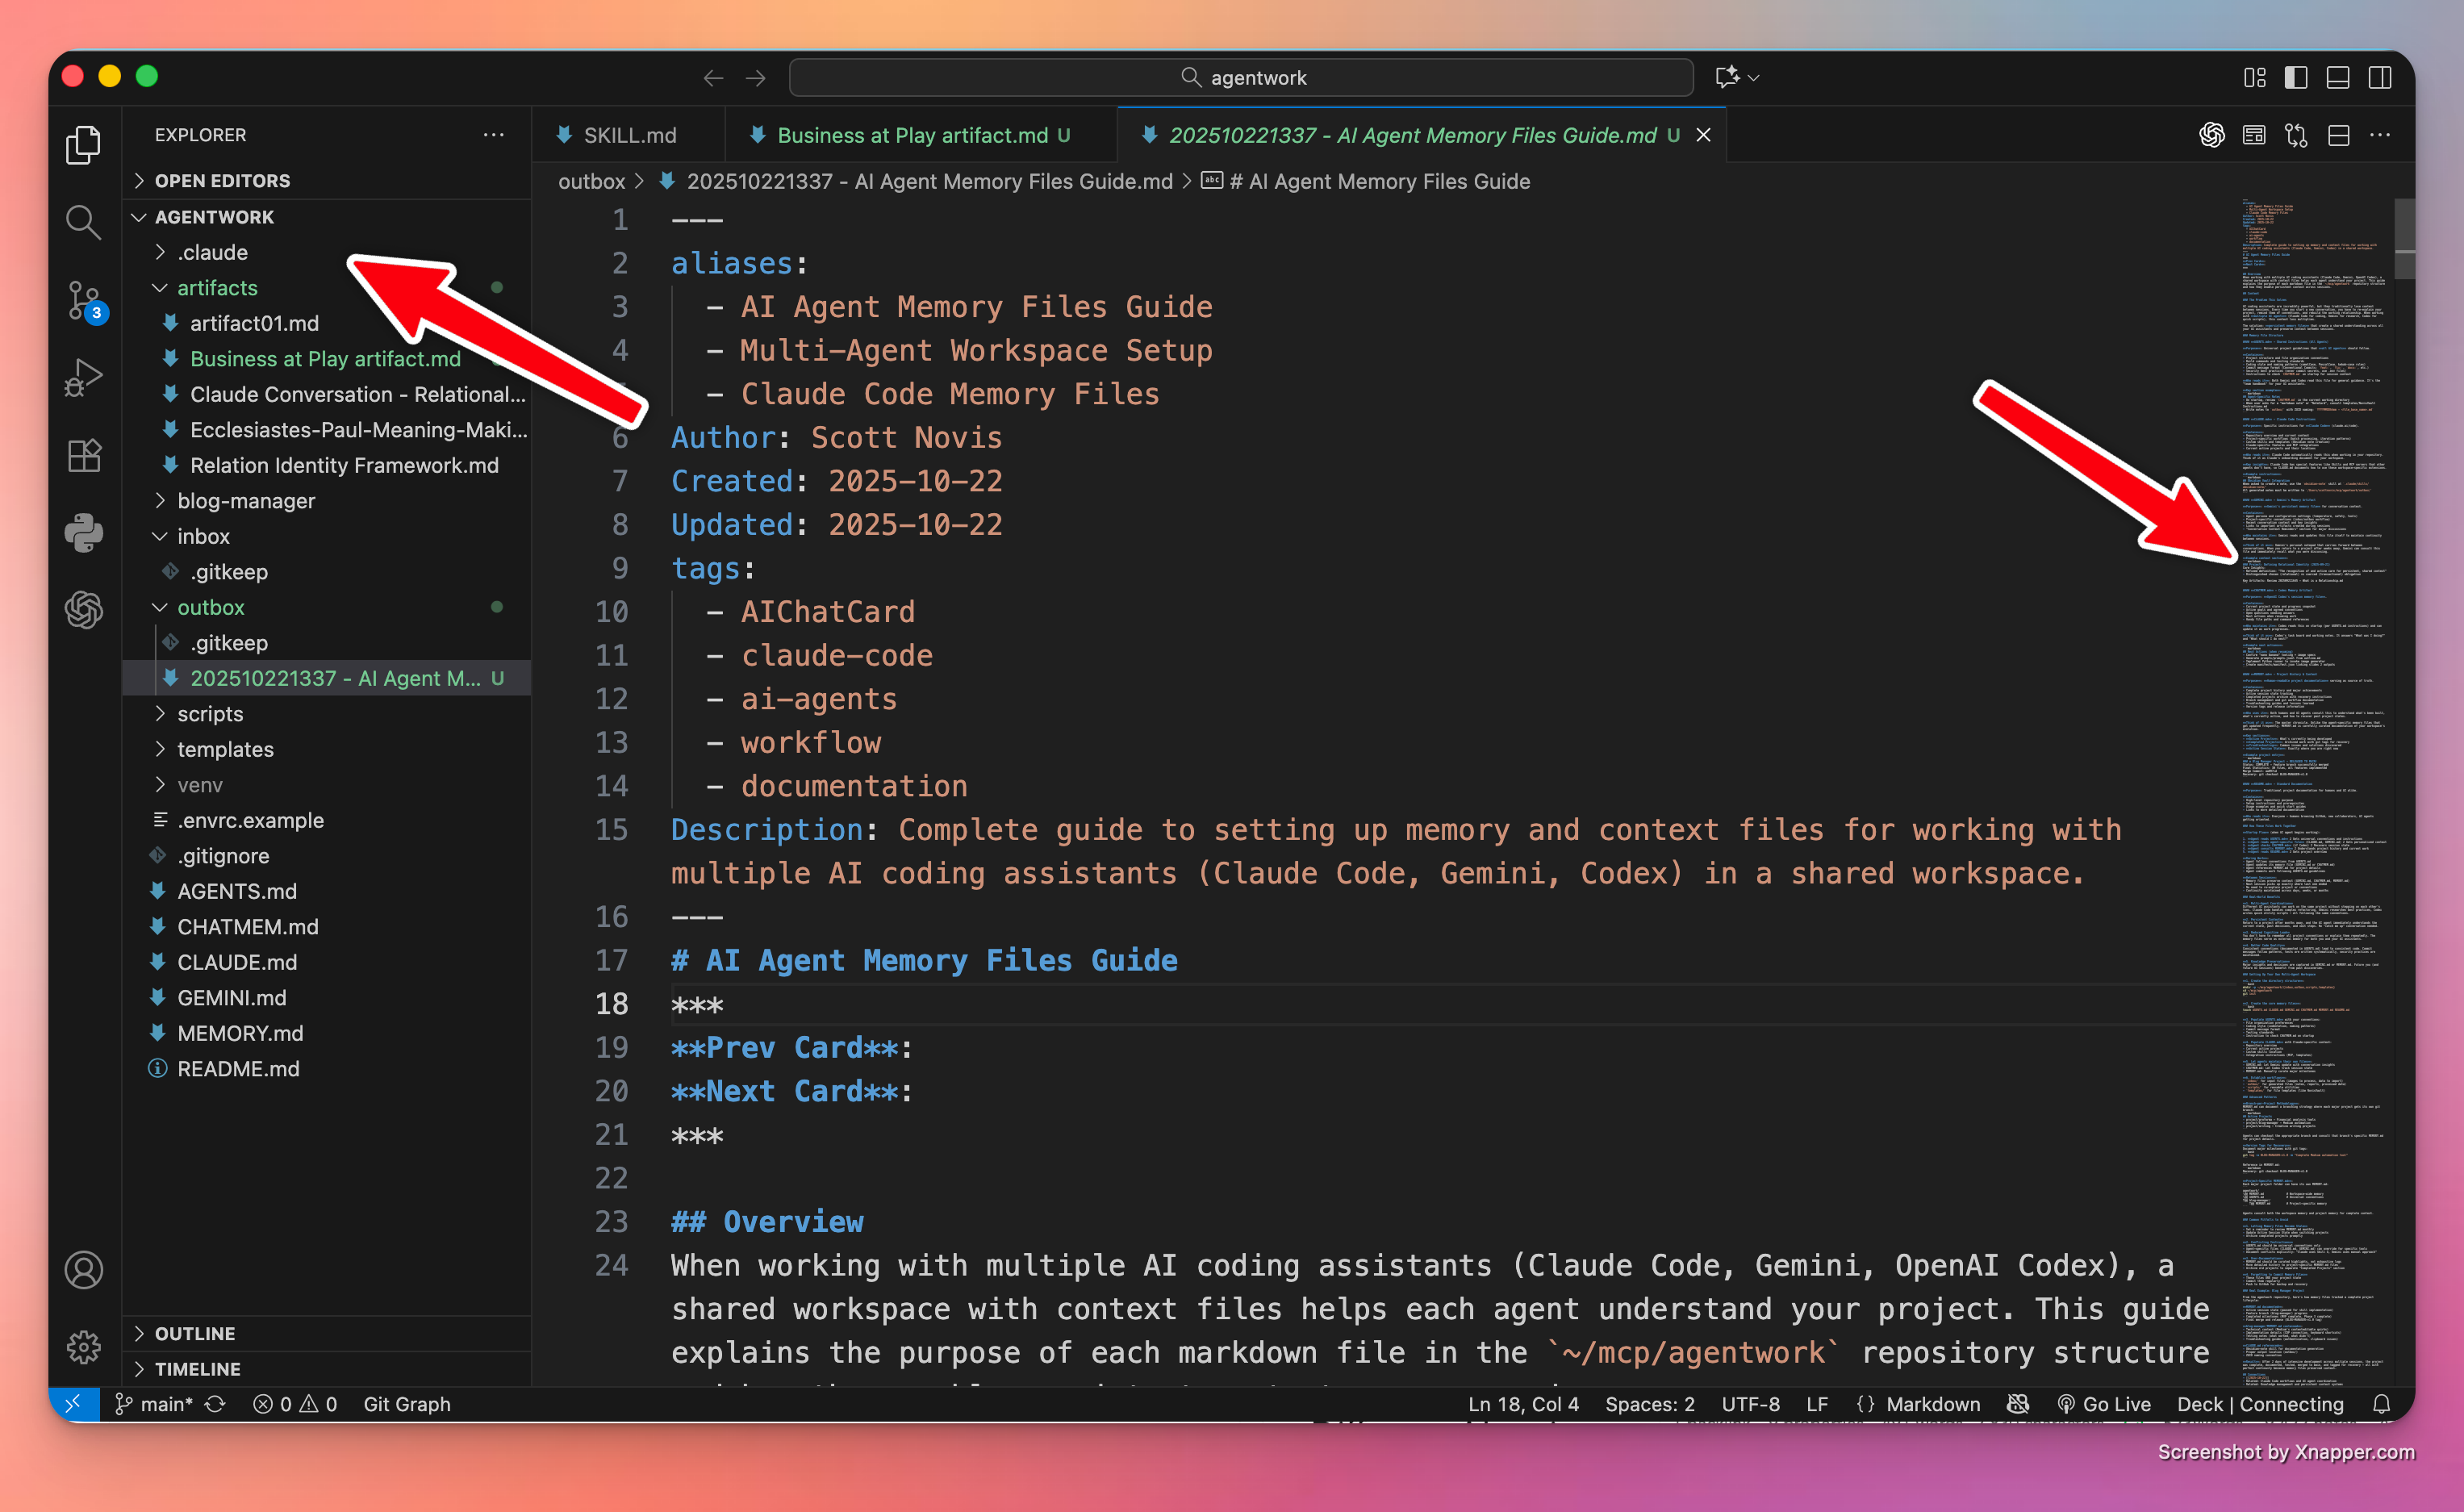
When working with multiple AI coding assistants (Claude Code, Gemini, OpenAI Codex), a shared workspace with context files helps each agent understand your project. This guide explains the purpose of each markdown file in the ~/agentwork repository structure and how they enable persistent context across sessions.
At the end of this post, I’m going to include a comprehensive guide to the following files:
- AGENTS.md - all agents read this file for conventions and instructions
- CLAUDE.md - Claude Code reads this file to get personalized context
- CHATMEM.md - helps Codex AI recover its session state
- MEMORY.md - any agent can read this to understand project history and current work
- README.md - the project overview
You can start simple, with an AGENTS.md file in addition to the README.md file you got by default from git when you created your repository.
In fact, the simplest thing you can do now is create an AGENTS.md file, but it’s important that you DON’T PANIC! Making files is fun.
Note: Working with files. To get the real power of vibe coding and working with AI that can actually do work on your local computer, you will need to learn how to manage and edit files. Two tools that are invaluable to me:
- A dual-pane file explorer like Commander One Pro, Marta, or Midnight Commander
- An integrated development environment (IDE) I highly recommend Marta app for MacOS: https://marta.sh/ and Visual Studio Code (VSCode) for MacOS: https://code.visualstudio.com/
Marta
A great tool for moving files around. In the image I’ve highlighted a few things, but the main idea is that you can compare two directories side by side, select any files you want, and then copy them to the other pane (folder). Marta makes it easy to move files around, which I do a lot of when I start working with code.
VSCode
I’m just going to say it: VSCode is the best code editor around. It is amazing. And I have a lot of code editors. Some I really liked for a long time (sorry BBEdit), but VSCode is hands down my go-to text editor. And one reason it’s so powerful? I can open the agentwork folder, see what’s in it, and any file I click on opens in its own editor tab. VSCode lets me keep an eye on files written and created by Claude Code, Codex AI, or Gemini CLI.
After you get VSCode installed, open your agentwork folder. Now get ready to have some fun. Run the terminal program, then enter:
cd ~/agentwork
claude
Claude Code
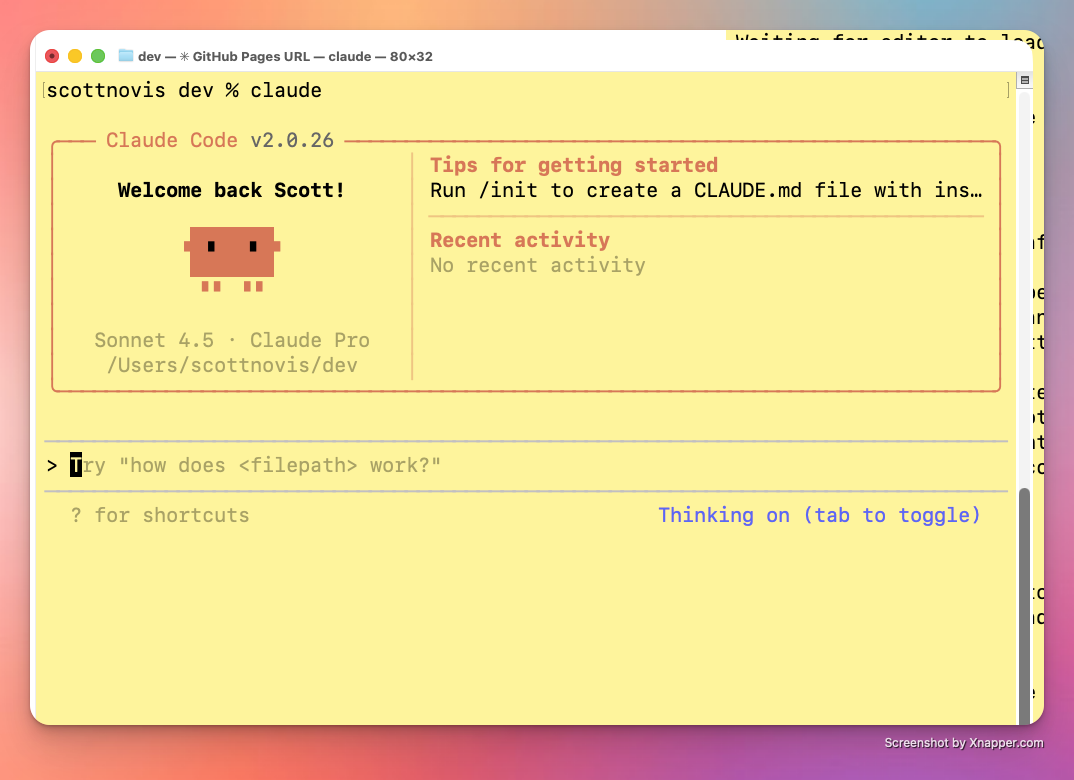
When Claude starts, the app prints its version number, some tips, a friendly robot face, and the prompt. In fact, in this screenshot it tells you that if you enter:
> /init
Then Claude will write a CLAUDE.md memory artifact. You can try that now, or skip ahead and keep reading… but then come back to it.
When Claude fires up, ask him (Calling Claude “it” didn’t feel right) to create the AGENTS.md file in the root directory of your project. The prompt could look a lot like this:
Can you please create an AGENTS.md file for this project in the root of this project? I want it to hold basic commands which you read on startup.
Now hit return and watch Claude do his magic. Almost immediately, Claude will try to do something with your files and the app will ask for permission. Pressing 1 grants one-time pass. Hitting 2 gives the AI carte blanche for that kind of command for the rest of the session (if you quit the app by typing exit, the permissions reset).
I do think I’m getting a sense of how the world ends. Someone yells at an AI agent while also granting them total autonomy: “Stop asking me questions. Just do the obvious thing!”
If you glance at your VSCode screen, you should see new files. If you click on the file, you can see its contents.
Time to Check In
At this point, I suggest you direct Claude to check in the new changes and push to origin. The command is literally what I just wrote:
please check in all changes and push to origin.
Claude will spin for a moment, then try to execute a git command, and you’ll have to give it permission. And then… it will take care of it for you, adding a comment, staging the file, then checking in the change, and finally pushing the new files to the cloud on GitHub.
Congratulations, you’ve started vibe coding. You’re directing, the AI is implementing and executing.
Inbox / Outbox
I also recommend adding two folders to your project. One is for files you want to process, the other is for files created by the AI. Inbox and outbox. You can easily add these two folders with the following commands (on MacOS) in the terminal.
Note: I always have several terminals open. One for each agent, and one to enter commands myself. Sometimes I like to run the commands myself as a way of staying in touch with what the AI is doing.
The simple commands are:
cd ~/agentwork
mkdir inbox
mkdir outbox
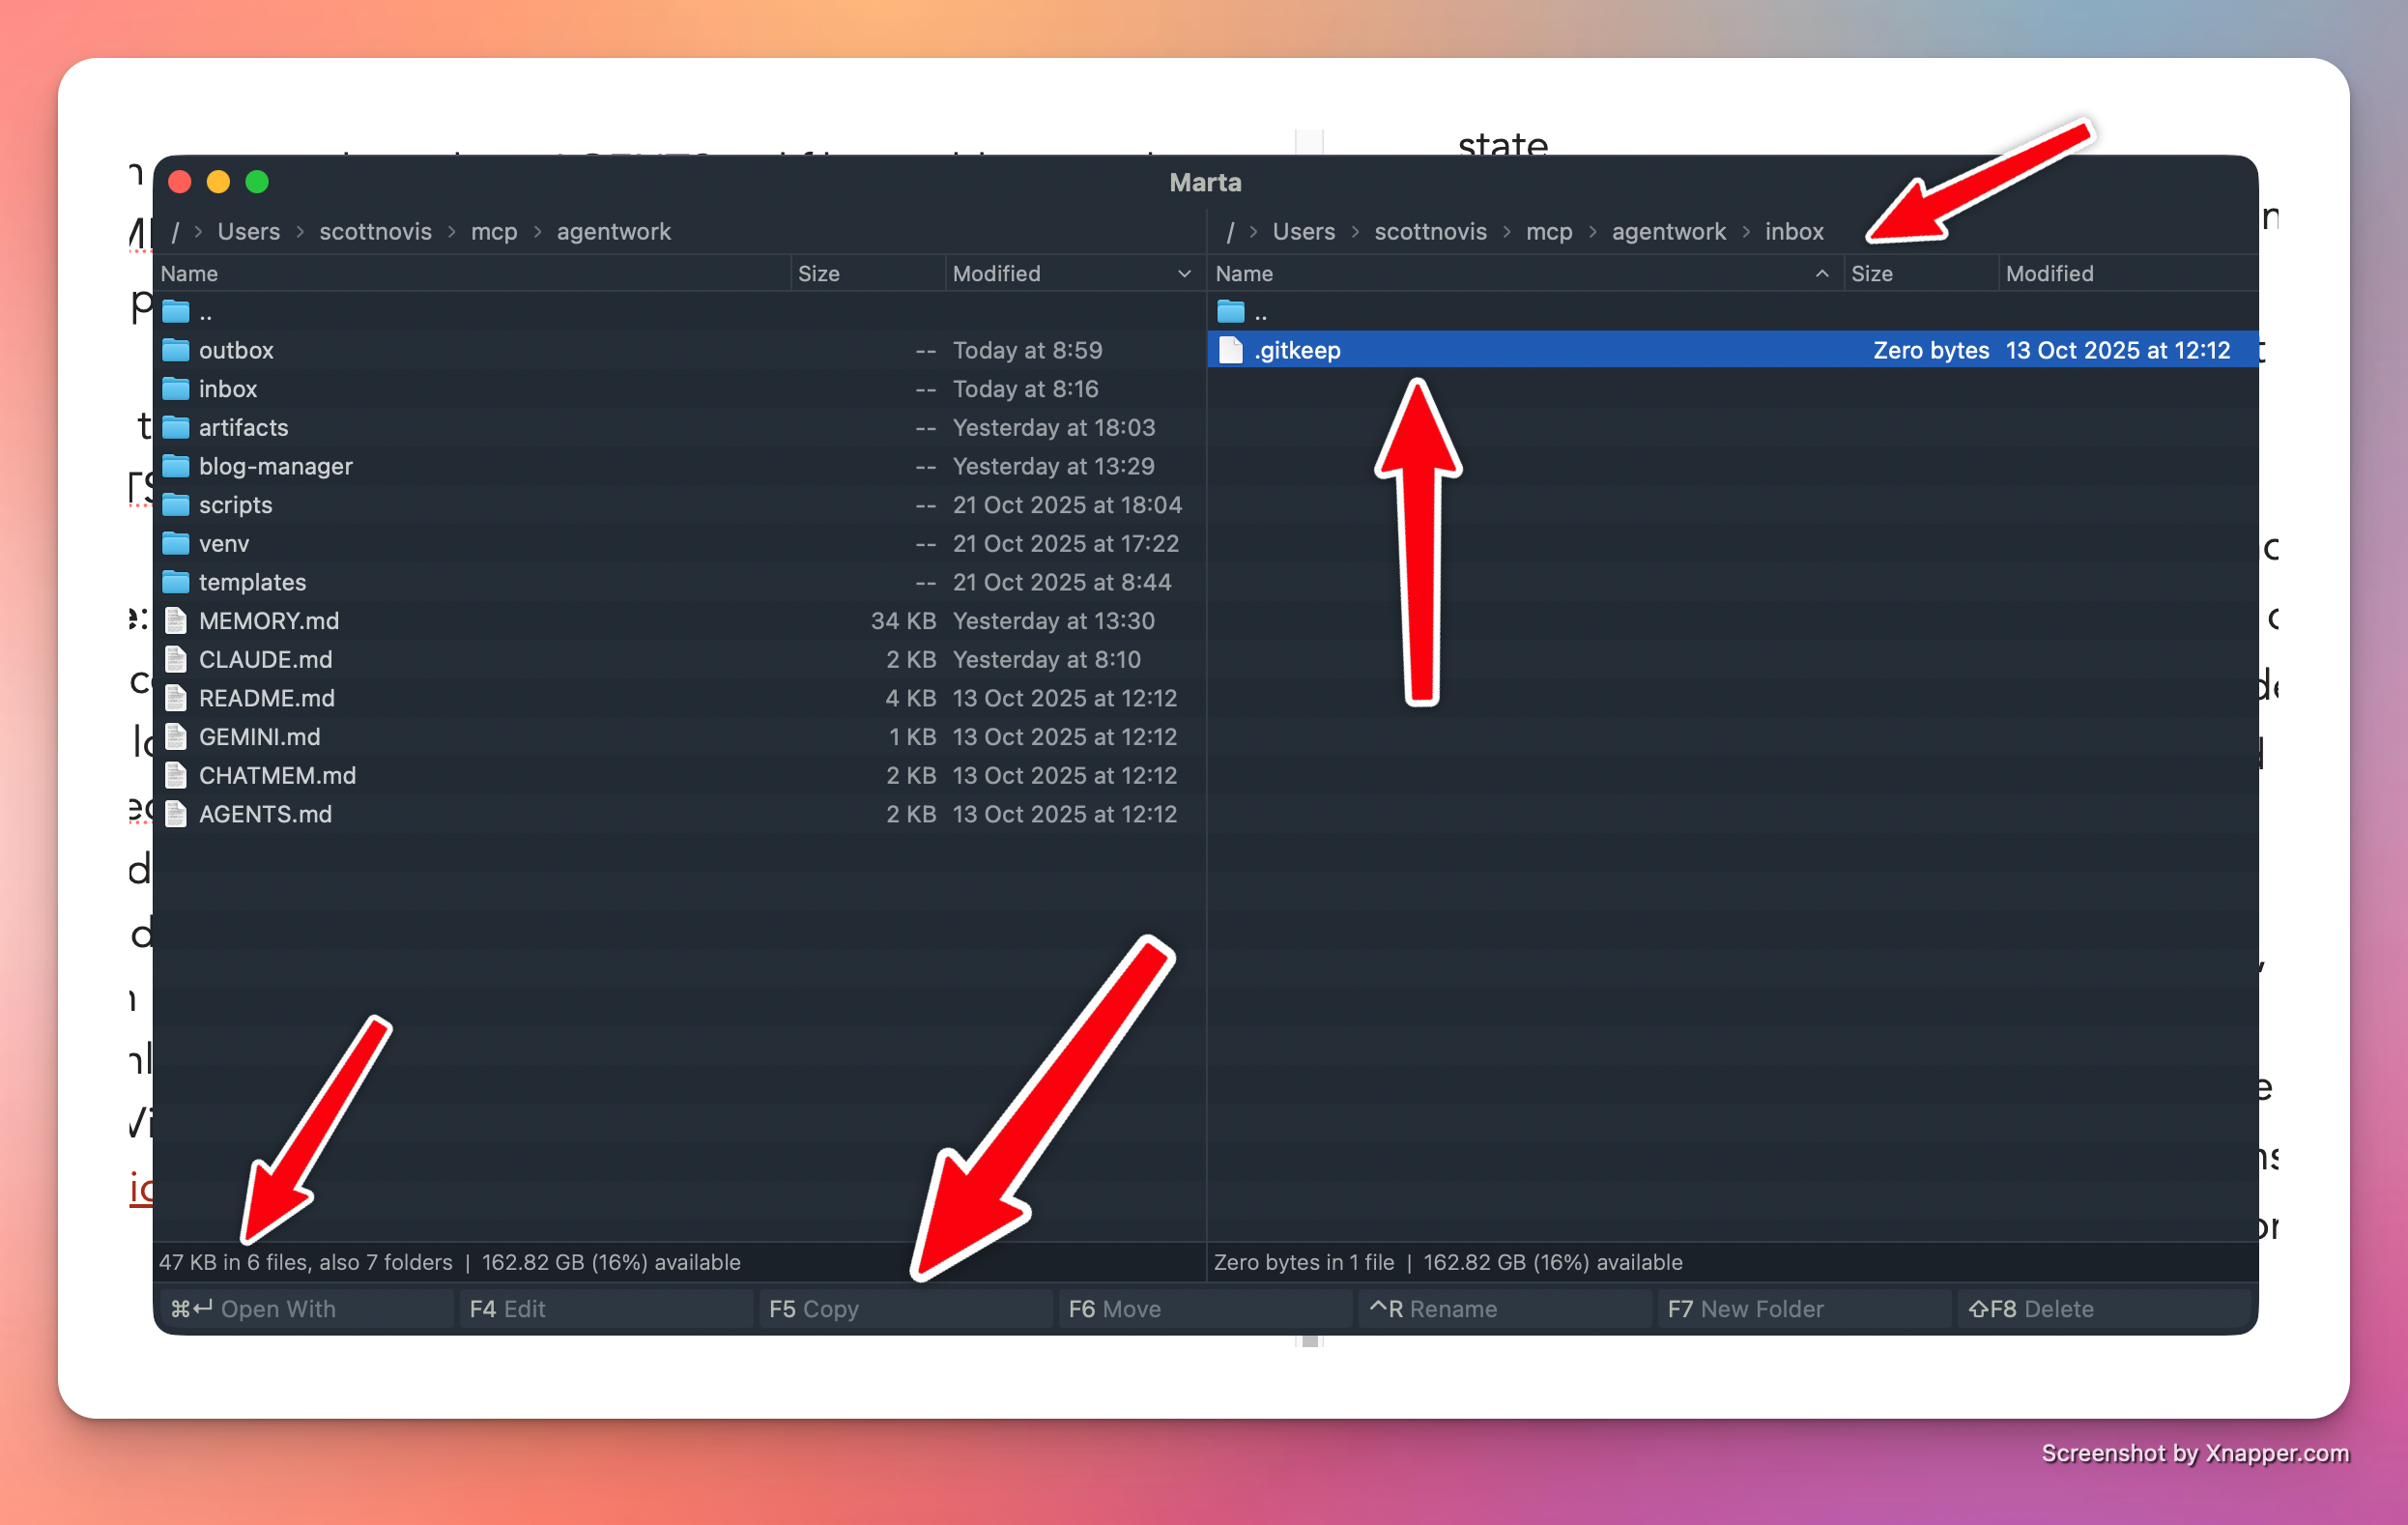
Now, there’s one other thing. Git will not store an empty directory. It only stores files. So to make sure these directories stay as part of your project, run the following commands:
touch inbox/.gitkeep
touch outbox/.gitkeep
Putting an empty but “real” file in the directories will cause git to track them and thus keep the directories. So .gitkeep is a convention, not an official part of git.
You can now tell Claude to update the AGENTS.md file with the following information:
Please add to the AGENTS.md file that the agent should look in the inbox to find files that need to be processed, and write new files in the outbox folder. For example, if I ask you to convert an artifact into an Obsidian note, you would find the artifact markdown file in the ~/agentwork/inbox and write it to ~/agentwork/outbox.
Claude will spin away, updating the agent file with this direction. From now on, the agents will know about this direction. So the AGENTS.md is like project-level instructions. The MEMORY.md file ends up being sub-project or task-related instructions, and those go into subfolders when I start new projects. But more on that later.
Ask Claude to check in and push all changes to origin. You want to do this early and often.
A Simple Project
Here’s something you could do to test your system. Record some audio of an event you’d like to turn into a story. Storytelling is hard, and too often we talk about the “stuff” and not the meat of the story. Use Otter, or your favorite voice-to-text app, and then put the raw text into a file in your project inbox. Now, direct Claude Code to find that file and help you turn it into an engaging story or anecdote. Remind Claude you want its help to “fix” the story, but make it simple enough that you can repeat it at your next coffee or forum meeting. Claude should render the output into the outbox in markdown format.
Let’er rip!
Inspect the results.
At this point, you can give Claude some feedback and have it revise the story until you’re happy. Then I would ask Claude to check in all changes.
Note: I used this method to proofread this blog post. Wrote it in Obsidian, put a draft in the inbox, had Claude proof it, which wrote to the outbox, then I added the new revision back to Obsidian by copying it. (I’m still not super comfortable with Claude writing directly into my vault—not comfortable at all, but maybe someday.)
At this point, you could begin some projects, but I think one of the most important things you’ll want to do next is install a Model Context Protocol server (MCP) for local file access so you can have Claude Desktop create files that your Claude Code can use. We’ll tackle that next.
How I use Generative AI to Think Better
I don’t (only) use AI to solve hard problems, in this article I share an example of how I use AI to help ME solve hard problems. I use it to coach me to think better and overcome my own cognitive biases. And if I can do it. You can do it.
Installing Claude Code
In this segment, I’ll walk you through installing Claude Code on your Mac. We’ll probably also have to install node.js and the node package manager (npm), but have no fear, it will all work out.
Create Note Chains in Obsidian with Templater Smart Templates
Using Templater Smart Templates, I blend PARA and Zettlekasten to create branches of linked notes. This article shares all the templates and explains the purpose and thinking behind it.