
Model Context Protocol GO v2
Unleashing Your Agent
I will admit that I have taken a somewhat roundabout path to get to where I wanted to go, but I have been trying to avoid the trap of the expert, namely that you know what I know. You could easily get here on your own by asking Claude “How do I setup a Model Context Protocol server on my machine?” And it will walk you through the steps. But what I wanted to do was share how one human (me) approached this. I believe that when we share our stories, it makes it easier to believe we could do the same.
So here is where I think we are:
- You have a git repository for your AI work. Think of this as the cloud backup for your work.
- You have cloned this repository on your local machine.
- You have installed node.js
- You have installed Claude Code (and maybe a few other AI agents)
At this point, you are now ready to tackle two interesting things:
- MCPs
- Skills
This article will touch on MCPs.
What is an MCP?
MCP in this context stands for Model Context Protocol, and it is essentially a standard to allow agent-like capabilities for Large Language Models. It tells Claude or ChatGPT how to talk to another service. There are two I personally have gotten the most use out of:
- Filesystem access
- Google Docs
I wish there was a functioning Google Drive connector, but it turns out Google Drive is not one thing but a layer of paint over a messy, discordant collection of applications. Kudos to Google for making that appear seamless to the user. Boo to Google for not making it equally seamless under the hood for lazy developers like me.
So what is an MCP? Think of it like a USB connector, but instead of connecting devices to your computer, it connects your AI Agent to your data and tools. It was launched by Anthropic in Nov 2024 as an open source standard. Claude believes the motivations for launching this standard were:
- Modern AI models are incredibly powerful, but they’re often isolated from data - trapped behind information silos and legacy systems
- Every company was building custom connectors for each data source
- There was no standardized way for AI to access tools and data securely
Key Design Inspiration: MCP deliberately reuses concepts from the Language Server Protocol (LSP) - the same protocol that powers code intelligence in VS Code and other modern IDEs. If LSP worked for standardizing how IDEs understand code, why not apply similar concepts to how AI systems access data?
Before MCP:
ChatGPT Plugin → only works with ChatGPT
Custom Claude Integration → only works with Claude
Copilot Extension → only works with Copilot
With MCP:
One MCP Server → works with Claude, ChatGPT, Gemini, etc.
MCPs in principle are universal.
[!note] At no point did Claude mention Skynet so it must be safe right?
Long and short, an MCP is how an AI agent on your machine can get out of its sandbox and start doing actual work for you.
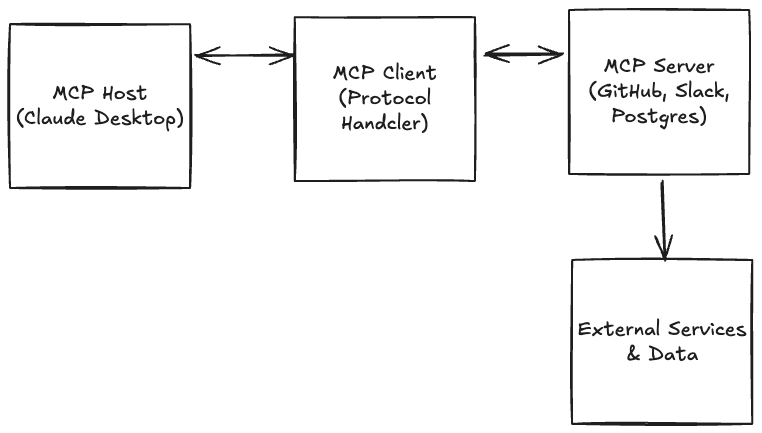
There are four parts to an MCP: the MCP Host, the MCP Client, and the MCP Server (See the TLDR for more details.)
What You Need to Make MCP Work
If you notice, I have walked you through most of these already. You need:
1. An MCP Host Application
- Claude Desktop (macOS or Windows) ✅
- Claude Code (CLI tool) ✅
- Other compatible clients (Cursor, Zed, etc.)
2. Node.js (for most MCP servers)
- Used to run JavaScript/TypeScript-based servers with
npx✅ - Verify:
node --version✅
3. Python (for Python-based servers)
- Used with
uvxorpip✖ - Verify:
python --version
I did not show you how to install Python (yet). I’ll touch on that shortly.
In addition to the environment, you will likely need API Keys or Access Tokens. I highly suggest you ask your LLM for specific directions on how to get these. I will tell you the access keys for Google are a PAIN to generate. It is a highly convoluted process. Also, some platforms (like Medium) have stopped giving out API keys to cut down on AI Spam Abuse1. One system you will likely want to get a token from is GitHub, as this makes running git commands in Claude Code easier.
A Word About Token Safety
You do not want to save your tokens in your git repository. To get around this, you can use a special file called .gitignore. It is in your project root, and because it starts with a dot “.” it will be invisible by default. When you use a dual pane file manager like Marta or Commander Pro, you can easily toggle a switch that says “show hidden files.” Both the macOS Finder and Windows Explorer also have the option to display hidden files. I am fairly confident VS Code shows hidden files automatically because developers need to edit them so often.
Anywho, the process of protecting your keys (there are a bunch of ways to do this) is to use direnv with .gitignore. Here’s how I did it:
1. Install direnv
cd ~/agentwork
brew install direnv
This will install the application. You will get a file in the root of your project called .envrc.example. It looks like this:
# direnv configuration (copy to .envrc and run: direnv allow)

# Option 1: Set variables directly (recommended)
# Add any project-scoped secrets below
# export ANTHROPIC_API_KEY="changeme"
# export ELEVENLABS_API_KEY="changeme"

# Option 2: Load from a local .env file (kept out of Git)
# Uncomment to auto-load a .env file if present
# dotenv_if_exists

# Optional: auto-activate Python venv if you use one
# layout python
# or specify: layout python3

# Optional: Node project setup (uncomment if helpful)
# use node

# Notes
# - Never commit your real .envrc (it's gitignored).
# - Run `direnv reload` after changes, or simply re-enter the directory.
The idea is to edit this file so that it looks the way you want (with no API keys) like this:
# direnv configuration (copy to .envrc and run: direnv allow)
export OPENAI_API_KEY="changeme"
export READWISE_TOKEN="REPLACEME"
export ANTHROPIC_API_KEY="changeme"
export ELEVENLABS_API_KEY="changeme"
As the file says, copy this file to .envrc and then edit that file so it looks something like:
cp .envrc.example .envrc
Then edit the .gitignore file so that it has these lines. This will prevent git from trying to send these files to the server:
# Environment & OS files
.envrc
.DS_Store
For reference, mine looks like this:
# Node & package managers
node_modules/
package-lock.json
pnpm-lock.yaml
yarn.lock

# Python virtual envs
.venv/
venv/

# Logs & temp
gptsh.log
logs/
tmp/

# Environment & OS files
.env
.env.*
.envrc
.DS_Store
I don’t want to track temporary files, log files, or my virtual environment files. Now you can go back and edit your .envrc file and set your API keys by replacing the “changeme” or “REPLACEME” text with your unique key. If you tell the AI that it can find its access token (aka API Key) in an environment variable named ANTHROPIC_API_KEY, it will use that in scripts it creates so that you don’t have to login.
Now to make use of these settings, all you have to do is run direnv in a command line, and your keys, which only exist on your local machine, will be loaded into environment memory and the command line tools will be able to access them. Pretty cool right? Okay, not that cool, but useful.
Practical Example
Here is an example of how I used this recently. I do most of my digital reading on the Kindle. However, I do all of my Bible study using Olive Tree Bible Study app. I have hundreds of highlights in Olive Tree. Readwise does not support pulling highlights out of Olive Tree. But Olive Tree supports exporting highlights. I was able to get an API key from Readwise, then have Claude build a Python application which converted my Olive Tree highlights into a format ideal for Readwise and voila, I pushed 600+ highlights into my Readwise account, and lo and behold they “automagically” also showed up in Obsidian. This is now an automation, so I can direct Claude to convert Bible study highlights whenever I want without having to login every time. I like this. Me gusta. I am convinced that is cool.
Now, back to setting up an MCP.
Letting Claude Edit Your Files
I believe Claude Desktop now supports having a built-in file system manager. You have to go to the Developer Tab in Settings.

Claude Development Settings
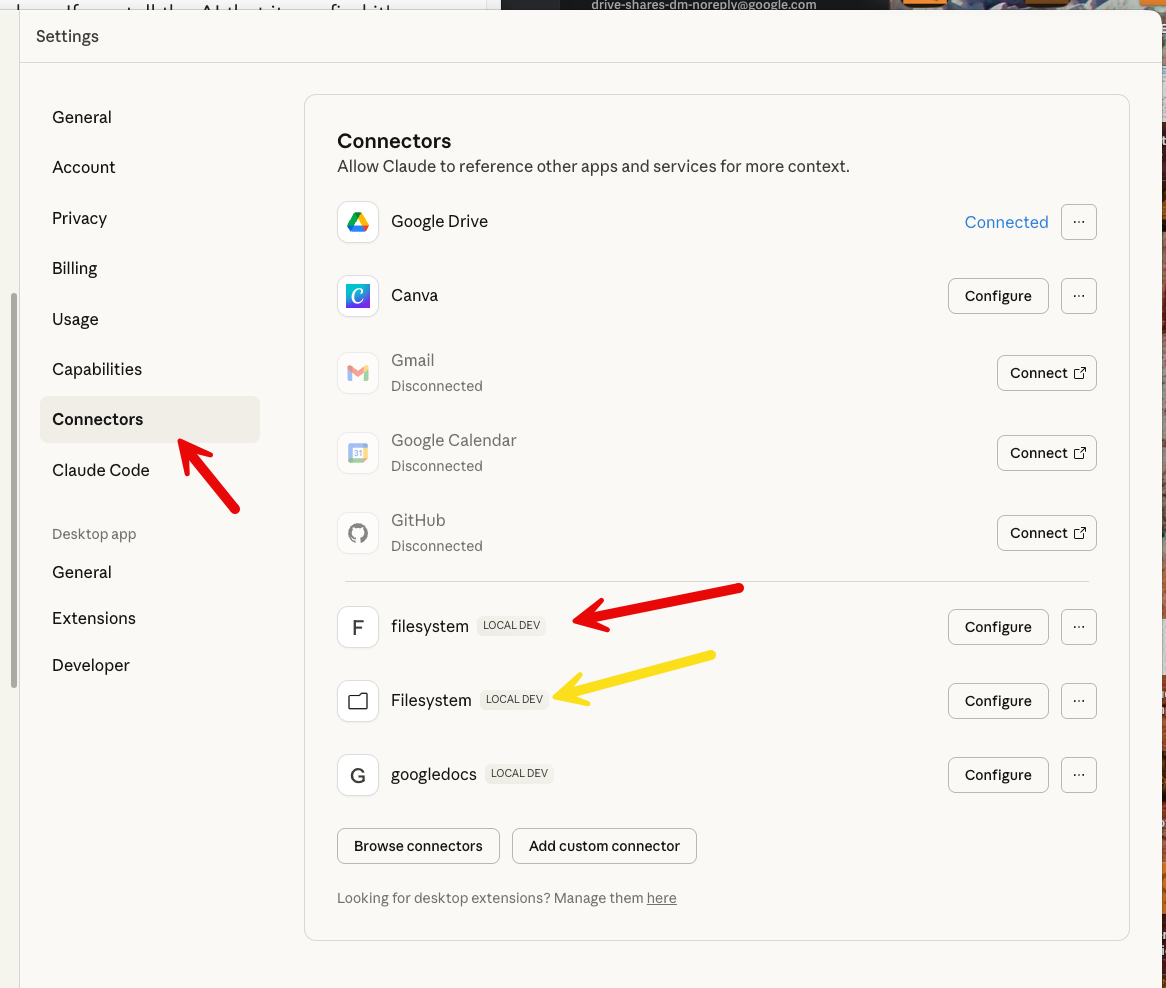
In the weird and wonderful way of development, there are two ways to get to this setting. And I have TWO filesystem connectors because one I set up myself and one comes with Claude. I’ll show you how I set up the third-party file system MCP (this was available before Anthropic bundled it with the app). I show it because it’s still a good example.
1 Setup Your Config File
You can find Claude’s Desktop configuration file here:
~/Library/Application Support/Claude/claude_desktop_config.json
[!note] The
~/Libraryfolder is hidden by default by macOS even though it does not start with a dot.
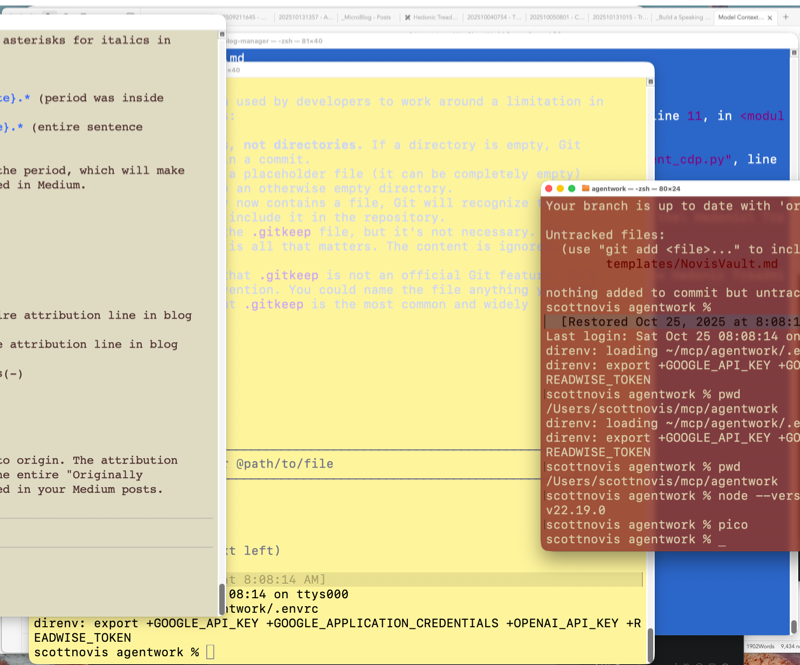
If you do not have a claude_desktop_config.json file then you can create one using the following commands in a terminal window. And you might want to get used to having lots of terminal windows open. I use the formatting preferences to give them different colors. That way I know what agent is running in which window. Blue for Gemini, Tan for Claude, Yellow/White for ChatGPT. The red window is where I enter commands and work.
# Navigate to the directory
cd ~/Library/Application\ Support/Claude

# Create the file if it doesn't exist
touch claude_desktop_config.json

# Also just make sure you have node installed (should be v22.x at the time of this writing)
node --version
Once you have created the file using touch, you can edit it. I learned how to use vim way back in the 80s so it is my go-to editor, but many people like nano and pico. All three are available in a macOS terminal. Once you have the file, you issue the command:
nano claude_desktop_config.json
Then you can copy and paste this into your config file:
{
  "mcpServers": {
    "filesystem": {
      "command": "npx",
      "args": [
        "-y",
        "@modelcontextprotocol/server-filesystem",
        "/Users/YOUR_USERNAME/Desktop",
        "/Users/YOUR_USERNAME/Downloads"
      ]
    }
  }
}
You would replace YOUR_USERNAME with, well, your actual username. Then type Ctrl-O to save the file and then Ctrl-X to quit. The shortcut keys are visible at the bottom of the nano screen.
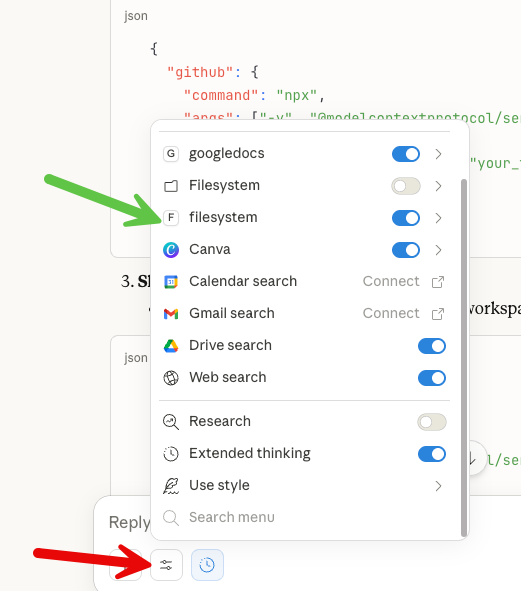
Now restart Claude and check in the settings box on your chat window, and you should now see filesystem available.
Now comes the crazy part. You can direct Claude to actually write files to your local machine. Instead of creating an artifact that you have to copy and paste, you can tell Claude directly to write the file. Also, you can tell it to find and read a file. Welcome to a whole new world.
I’m going to stop there for today.
Summary
You learned how to install a basic MCP into Claude you can use to access your file system from the desktop app. You also learned how to protect your API keys and put them in your environment so Claude/Codex/GeminiCLI can access them safely. And we set up Claude Desktop to use a fun MCP server to read and edit local files.
[!warning] If you ran into trouble You can ask Claude to help you debug it. Share any error messages you are getting during this process. You may find that it is better to debug with Claude Code (because it already) has file system access and can help figure out what you did wrong or what needs fixing on your system. The AIs are shockingly useful in helping you get the AI running.
The combination of MCP and file system access is super powerful. Next time we’ll dig into setting up your Python environment so you can begin vibe coding in earnest.
TLDR;
-
MCP Host: The application users interact with (Claude Desktop, IDEs like Cursor, chat interfaces)
- Manages MCP clients
- Enforces security policies
- Handles user consent and authorization
-
MCP Client: The connector within the host
- Maintains 1:1 stateful sessions with MCP servers
- Implements the client side of the protocol
- Acts like an agent deciding which tools to use
-
MCP Server: Exposes tools, data, and prompts
- Can be local (running on your machine) or remote (cloud-hosted)
- Provides capabilities to the AI through a standardized interface
- Handles the actual interaction with data sources/APIs
Communication: MCP uses JSON-RPC 2.0 for message passing, similar to LSP.
EndNotes
-
Annoying, but I understand it. ↩︎