
Create Note Chains in Obsidian with Templater Smart Templates
How to “Luminate” Your Notes
Niklas Luhmann was a German sociologist who no one would have ever heard of had Sönke Ahrens not written a book about him called How to Take Smart Notes. In a nutshell, Luhmann was staggeringly, impossibly productive as a sociologist, writing an unbelievable number of peer-reviewed articles and books in his field largely because of his note-taking system.
Anyone who works with knowledge should pay attention to Luhmann and his Zettelkasten1 system. I’m not going to explain the full system here, but I will tell you specifically how I set mine up using Obsidian and Templater. This article is designed to make it as straightforward as possible for you to begin creating “note chains,” though it does involve some tricky techniques which I’ll explain in the technical details section below.
Put simply, I use a blend of the PARA and Zettelkasten methodologies to create knowledge maps2.
Visually, project notes look like this:
[Project Index: Agentwork]
│
├── [[Idea Genesis – Why Agentwork?]] → [[Research Notes – Overview]] → [[System Details]]
│
├── [[Case Study]] → [[Source Material for Study]]
│
├── [[Design Notes]] → [[Prototype Draft v1]] → [[Prototype Feedback Notes]]
│
├── [[Meeting Notes 2025-01-15]] → [[Decision Log – Agent Goals]] → [[Task List – Phase 1]]
│
└── [[Lessons Learned]] → [[Action Steps for Next Iteration]]
The project file, or note index file, contains a list of “branches” (the first note in a series of notes). Then each subsequent note is linked to the others in a long thread. What if you want to see all the notes? Don’t worry—there’s a file list block so you always have visibility into everything.
To accomplish this, I have templates that:
- Create a project or home note
- Create the first branch note
- Create the next note in a chain
These templates ensure each file has:
- Properly formatted frontmatter3
- The right tags
- Unique file names
- Intelligent links to each other
- Aliases so I can link to human-readable names and ignore the unique identifiers at the front of the file names
- A consistent file structure
Prerequisites
Before you can use this system, you’ll need to install the Templater plugin from Obsidian’s Community Plugins. Go to Settings → Community Plugins → Browse, search for “Templater,” and install it. Once installed, I recommend creating a dedicated folder for your templates—I use /templater in my vault root. You can configure this folder location in Templater’s settings under “Template folder location.”
TLDR; - The Technical Details
Let’s start with the end in mind. Here’s what I do (feel free to remove anything you don’t want to use):
- I organize around PARA
- I make a new folder for each new project, area, or resource
- Inside the new folder, I make a home note (aka an index note)
- Then I start creating thought “trains” from the main index note
- I try to keep to one idea per note file4
- I link my cards forward and back using Next Card / Prev Card navigation links
The file structure looks like this:
Vault/
├── 1. Projects/
│   ├── Project - Agentwork/
│   ├── Project - New Location/
│   └── Project - Experiment/
│
├── 2. Areas/
│   ├── Area - Home/
│   ├── Area - GameTruck/
│   └── Area - Health/
│
├── 3. Resources/
│   ├── 3D Printing/
│   ├── Psychology/
│   └── Scripts/
│
├── 4. Archives/
│
└── templater/
    ├── DV Project Plan - TMPLTR.md
    ├── Home Note - TMPLTR.md
    ├── Branch Selection to ZNote.md
    ├── SUB TMPLT - Branch ZUnique Note.md
    ├── Next Note in Chain - TMPLTR.md
    └── SUBTEMPLATE Next ZUnique Note - TMPLTR.md
I number the PARA folders so they always sort correctly. With this structure, here’s the overview of how I make note chains:
- Create a top-level project file inside the project/area/resources folder
- Create a new branch card from that home note
- Keep adding note cards to the end of the branch
- Sometimes I’ll branch off a branch
- Whenever possible, I link notes (leaves/nodes) to other related notes—they call it linking your thinking in PKM terms
Inside each folder, like Project - Agentwork, I create the first file. I usually flip the naming so it would be _Agentwork Project.md. I give it an underscore so it always sorts first in the folder.
Creating the Project Template
When I open that new note, I use Templater to run the following template (save this in your /templater folder as DV Project Plan - TMPLTR.md):
---
aliases:
  - <% tp.file.title.slice(1) %>
Author: Scott Novis
Version: 4
Created: <% tp.file.creation_date("YYYY-MM-DD") %>
Updated: <% tp.file.creation_date("YYYY-MM-DD") %>
tags:
  - ProjectPlan
  - StartCard
Description:
---

# <%tp.file.title.slice(1)%>

## Overview
_Quick overview, purpose, standards._

## Goal
_What should be happening?_

## Problem
_What is preventing this from happening?_

## Solution
_How can we solve it?_

## Branches


## Resources


## Tasks


## Files
(see block below)

## Connections
- [[<% tp.date.now("YYYY-MM-DD") %>]]
Listing All the Files
I like to see all the files in my folder sorted by created date (newest at the top) with a little more information about each file.
So I use a base query. Important: In the template itself, I name this xbase instead of base, because if you name it base, Templater will try to process it during template expansion. After you’ve run the template and created a few files in your directory, you can manually change xbase to base in your project note, and the query will start working:
filters:
  and:
    - file.path.startsWith("<% tp.file.folder(true) %>")
formulas:
  Note Card: link(file,aliases[0])
views:
  - type: table
    name: Notes
    order:
      - formula.Note Card
      - Created
      - Updated
      - Description
    columnSize:
      formula.Note Card: 501
      note.Created: 183
      note.Updated: 187
Remember: Include this block in your template with xbase, then change it to base after the template has been expanded and you have some files to display.
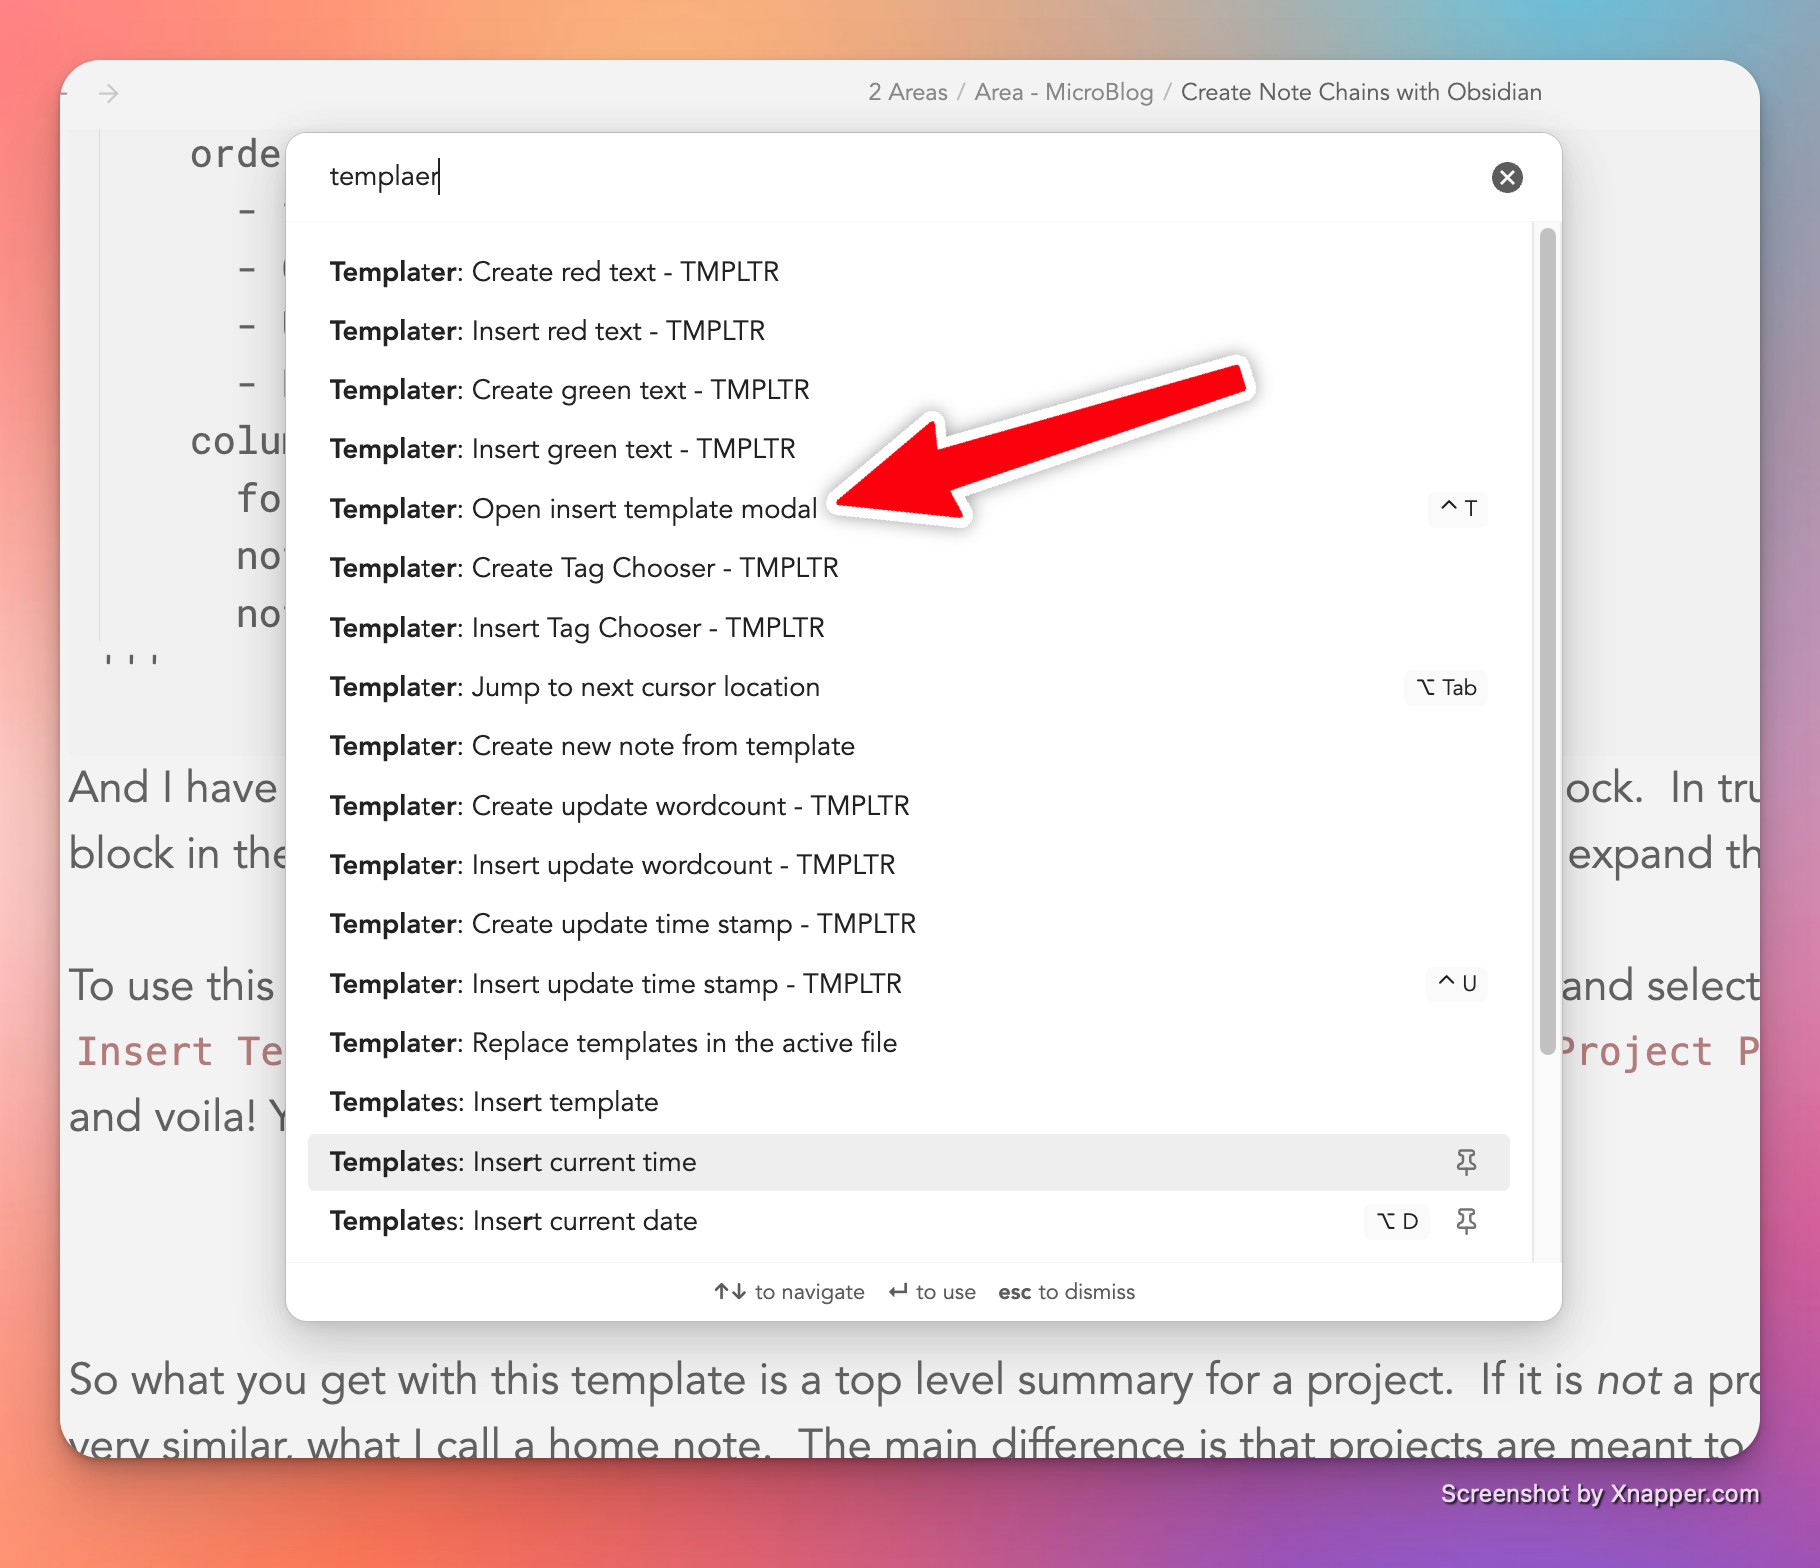
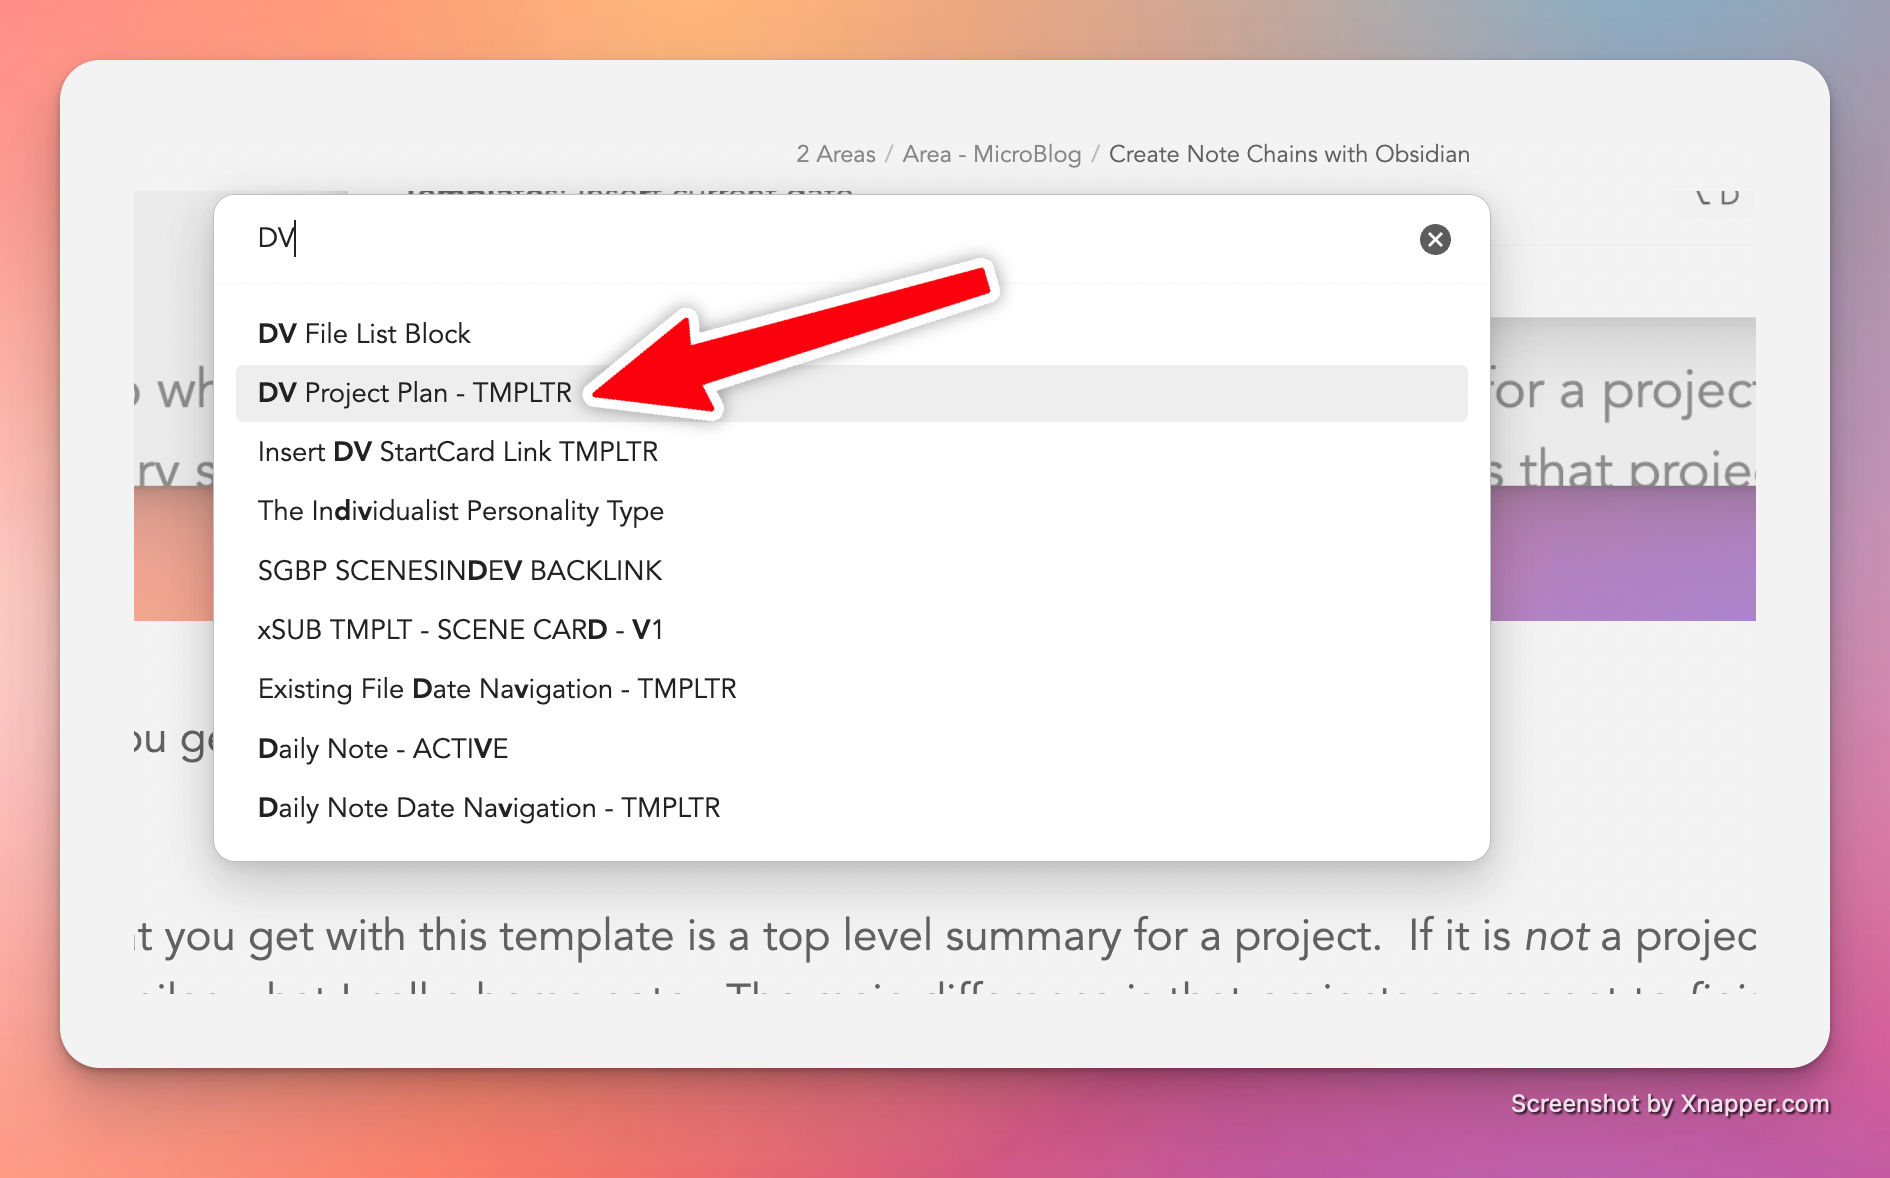
To use this template, open the new empty project file, type Cmd+P (or Ctrl+P on Windows), and select Templater: Open Insert Template Modal. You’ll get a dialog box where you can pick DV Project Plan - TMPLTR from the list, and voilà! You now have a nicely formatted project home note.
then you get:
You will execute all the Templater smart templates like this.
Home Notes
For an area or resource, I use a similar template called a “home note.” The main difference is that projects are meant to finish, while areas and resources do not need (and in many cases should not have) completion dates.
Here’s the home note template (save this as Home Note - TMPLTR.md in your /templater folder):
<%*
let basename = tp.file.title.slice(1);
let wordToReplace = "Home Note";
let replacementWord = "Note";
let modifiedString = basename.replace(new RegExp(wordToReplace, "gi"), replacementWord) + " Index";
console.log(modifiedString);
const folderPath = tp.file.folder() || '';
const folderName = folderPath.replace(/\/$/, '').split('/').pop();
%>---
Aliases: [<%modifiedString%>]
Author: Scott Novis
Created: <% tp.file.creation_date("YYYY-MM-DD") %>
Updated: <% tp.file.creation_date("YYYY-MM-DD") %>
Version: 5
Tags: [HomeNote, StartCard]
Description: Discoverable comment
Rating: 1
---
# <%tp.file.title.slice(1)%>

## Overview

## Resources

## Tasks

## Branches
-


## Notes In This Folder
(same xbase code as above—remember to change to base after expansion)

## Connections
- [[<% tp.date.now("YYYY-MM-DD") %>]]
The home note contains extra JavaScript to handle cleaning up the name. If you don’t care about that, just remove it.
Alternative: Using Dataview for File Lists
You can also use Dataview to generate a file list (I used to do this before Obsidian introduced Bases):
TABLE WITHOUT ID
	link(file.name,file.aliases[0]) as "Note",
	Comments as "Description"
WHERE
	contains(file.path, this.file.folder)
	AND file.name != this.file.name
SORT row.file.aliases[0] ASC
Why Clean Names Matter: Zettelkasten IDs
One reason I have a lot of code in my templates is that I use Zettelkasten IDs (ZIDs). Every note file is prepended with the year, month, day, hour, and minute it was created. For example, if I’m writing on October 19 at 4:33 PM, the ZID would be: 202510191633.
Why do this? Because once you start accumulating thousands of notes, you’ll discover how hard it can be to generate unique note names quickly. Using the convention ZID - Title lets you come up with unique file names nearly every time. And Obsidian supports aliases, so I can have unique file names but only see clean, simple names when I refer to a file via wiki link.
To make it clear: I can have a note called 202510191633 - smart idea.md, but when I refer to it in my main project, I use the vertical bar (aka the pipe) to create a link like this:
[[202510191633 - smart idea|smart idea]]
This will be displayed as a link with the name smart idea.
Building Note Chains
Now, once I have a project or home note to be the root of my tree of ideas, I can start building branches. The way I build a branch is to type out the title of the note I intend to create like so:
## Branches
- New Smart Idea
Then I select the words New Smart Idea and launch a Templater template I’ve labeled Branch Selection to ZNote. This will trigger two templates that do a lot of work for me.
Step 1: Branch from Selection
The selected text will become the “title” of my new note, but the note will use the ZID naming convention.
Template: Branch Selection to ZNote.md (save this in your /templater folder):
<%*
/* Make a new note branch from selected text */
let frontmatter = tp.frontmatter;
let aliases = tp.frontmatter["aliases"];
window.prev_note = tp.file.title;

if (aliases === undefined) {
	window.prev_note = prev_note
	console.log("Aliases are undefined");
} else{
	window.prev_note = prev_note = tp.file.title.trim() + "|" + aliases[0];
	console.log("Aliases:", aliases)
}
console.log(aliases);

const selection = tp.file.selection();
if (!selection) {
    const userInput = await tp.system.prompt("Enter Title:");
    new_note_title = userInput ? userInput.trim() : "UNNAMED";
} else {
    new_note_title = selection.trim();
}

console.log("Setting tp.user.prev_note to:", prev_note);
tp.user.prev_note = prev_note;
console.log("tp.user.prev_note: ", tp.user.prev_note);

file_name = tp.date.now("YYYYMMDDHHmm") + " - " + new_note_title;

tp.file.create_new(tp.file.find_tfile("SUB TMPLT - Branch ZUnique Note"), file_name, false, app.vault.getAbstractFileByPath(tp.file.folder()));
%>[[<%file_name%>|<%new_note_title%>]]
I’ll be honest—this took me a long time to figure out. It only works because it can call upon a second template, something I call a SUB TMPLT. When this template is run, it figures out what to name the new note, saves the name of the current note, then calls another template and passes it this key information. That second template runs on the new file.
A note on the window.prev_note workaround: Templater templates run in isolated scopes, which means variables from one template aren’t normally accessible in another. By storing the previous note’s information in window.prev_note, I’m using the global window object as a bridge to pass data between the two templates. It’s a bit of a hack, but it’s the most reliable way I’ve found to maintain context across template calls.
Step 2: Format the New Note
Sub-template: SUB TMPLT - Branch ZUnique Note.md (save this in your /templater folder):
---
aliases:
  - <%new_note_title%>
Author: Scott Novis
Created: <% tp.file.creation_date("YYYY-MM-DD") %>
Updated: <% tp.date.now("YYYY-MM-DD") %>
tags:
  - BranchCard
Description:
---
# <% new_note_title %>
<%*
/*****
* Get the global from the window space—the only place I seem to be able to safely
* and consistently pass values from one template to another.
******/
const prev_note = window.prev_note;
-%>
***
**Prev Card**: [[<% prev_note %>]]
**Next Card**:
***

## Overview


## Content


## Connections
- [[<% tp.file.creation_date("YYYY-MM-DD") %>]]
The end result of running this function is that I get a new note with a Zettelkasten ID and the name I wanted to give it as an alias, and the structure of the file is set up to link back to the parent.
Step 3: Extend the Chain
Once you’re comfortable with making a newly formatted note named after selected text, it’s pretty easy to extend the idea to… well, extending the note chain. I type in a new note name after the Next Card: navigation marker, select that text, then invoke the Templater template: Next Note in Chain - TMPLTR. It does pretty much the same thing as branching, only it sets a different tag for the card.
Template: Next Note in Chain - TMPLTR.md (save this in your /templater folder):
<%*
/* Make a new note in the branch */
frontmatter = tp.frontmatter;
aliases = tp.frontmatter["aliases"];
prev_note = tp.file.title;
if (typeof aliases !== "undefined") {
   prev_note = tp.file.title + "|" + aliases[0];
}

new_note_title = tp.file.selection();
file_name = tp.date.now("YYYYMMDDHHmm") + " - " + new_note_title;

tp.file.create_new(tp.file.find_tfile("SUBTEMPLATE Next ZUnique Note - TMPLTR"), file_name, false, app.vault.getAbstractFileByPath(tp.file.folder()));
%>[[<%file_name%>|<%new_note_title%>]]
Sub-template: SUBTEMPLATE Next ZUnique Note - TMPLTR.md (save this in your /templater folder)5:
---
aliases:
  - <% new_note_title %>
Author: Scott Novis
Created: <% tp.file.creation_date("YYYY-MM-DD") %>
Updated: <% tp.date.now("YYYY-MM-DD") %>
tags:
  - NoteCard
Description:
---
# <% new_note_title %>
***
**Prev Card**: [[<% prev_note %>]]
**Next Card**:
***

## Overview


## Content


## Connections
- [[<% tp.date.now() %>]]
Summary
Here’s the thing: If you use ChatGPT or Claude and feed it this article, it will be able to help you understand what I’m doing, why I’m doing it, and help you decide if:
- You should do it too, and
- If you want to do it, how to get it running in your setup.
Footnotes
-
Zettelkasten is German for “slip box.” Basically, a slip is a piece of note paper, so the more useful translation is “notebox.” ↩︎
-
But if you don’t know what PARA or Zettelkasten is, that’s not simple at all, is it? ↩︎
-
Also called YAML or Properties. ↩︎
-
I think of note files as “note cards” (Luhmann’s “slips”). ↩︎
-
I copied my actual working code, not cleaned-up super-presentable code. ↩︎